Since most of the computer users all over the world are using Microsoft Windows as their main operating system, and a new version of it has been released, all the old Microsoft Windows 10 users need to upgrade their PC to the new Windows 11. Unfortunately, about 43.2% of PCs and hardware did not meet the minimum requirements for the upgrade. Therefore, in this tutorial, we will guide you step by step how to install windows 11 on unsupported PC and hardware.
Things to Know before Upgrading to Windows 11
According to Microsoft, Windows 11 requires an 8th gen or newer Intel processor to officially upgrade to Windows 11. You also need TPM 2.0. If your PC hardware does not match the required needs then you can not officially upgrade your Windows 10 to Windows 11.
Remember that installing Windows 11 on an unsupported pc or hardware is possible but it's not a great idea and according to Microsoft, it's just an option for organizations and techie groups to test Windows 11. However, anyone can upgrade their unsupported PC or hardware to Windows 11 at their own risk. Just remember that there won't be any guarantee of system stability and compatibility for drivers.
Moreover, there may not be any security updates for your PC in the future if you install windows 11 on an unsupported pc or hardware. However, it's quite possible to downgrade back to Windows 10 in the settings till 10 days after installing Windows 11 on your unsupported pc.
Download Windows 11 ISO File
If your computer hardware does not support Windows 11, don't worry, you are still able to upgrade your PC to Windows 11. But remember it's not possible from Windows update. Rather, you would need to install Windows 11 using a bootable USB flash drive or ISO file to perform the installation process.
If you don't have Windows 11 ISO file, you can download it from Microsoft's official website completely free and legal.
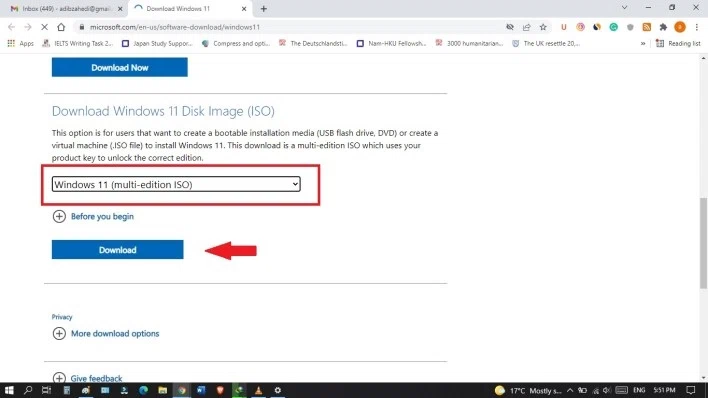
- Step 1. Once you're on Microsoft's official website page, scroll down and select "Windows 11(multi-edition ISO)" and hit the "download" button.
- Step 2. Then select your language and hit the "Confirm" button.
- Step 3. Finally, click the "64-bit Download" button and your download will start automatically.
Windows 11 ISO file from its official website is 5.18 Gb. Once Windows 11 ISO file is downloaded you are ready to go to the next step.
Ways to Install Windows 11 on Unsupported PC
Bypass Requirement Check by Modying Registry
If your computer lacks of CPU requirement or TMP 2.0 support, then editing Windows registry is probably the easiest way to bypass Windows 11 requirements check. However, modifying the Registry entry may damage your computer and cause data loss, so do so at your own risk and it is recommended that you back up the registry first.
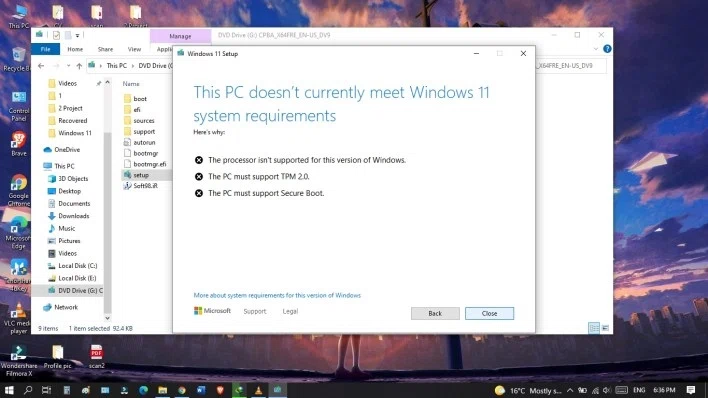
If you start Windows 11 installation process you will face an error saying "This PC doesn't currently meet Windows 11 system requirements".
To get rid of this error, we need to make a simple change to Registry Editor:
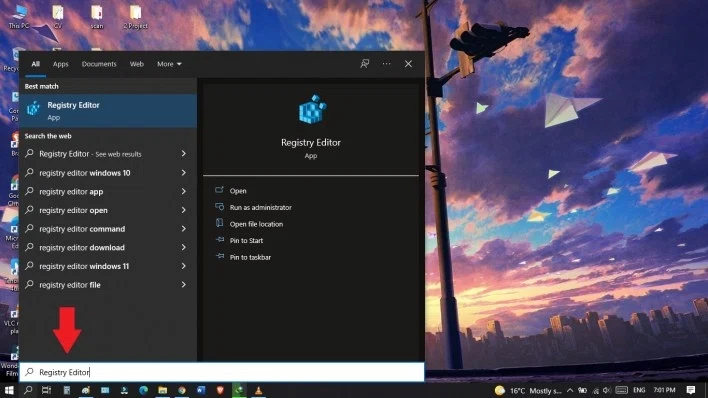
Step 1. To open Registry Editor go to the search field on your taskbar. Type "Registry Editor" and open the Registry Editor.
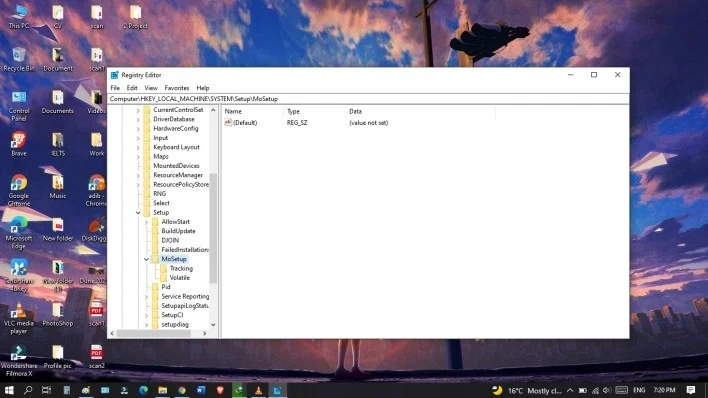
Step 2. Once the Registry Editor is opened, we need to navigate to a specific location. Just copy the location and paste it in the location field. Navigate to:
Computer\HKEY_LOCAL_MACHINE\SYSTEM\Setup\MoSetup
Step 4. Now that we are in the correct location, over on the right-hand side, check if you already have a value for "AllowUpgradesWithUnsupportedTPMOrCPU".If you don't have this yet, that's okay. Simpley pick New – DWORD (32-bit) Value.
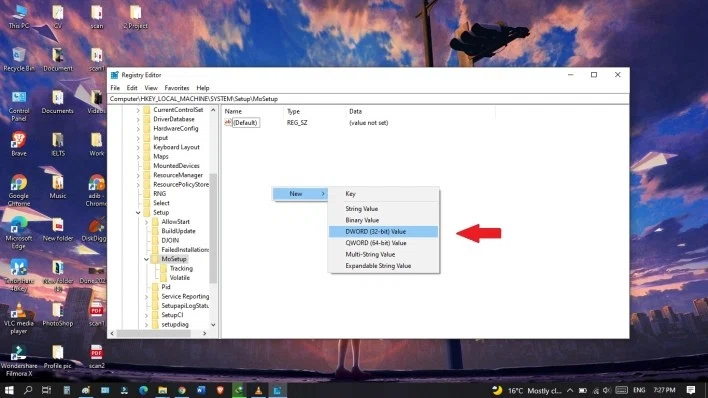
and name the value "AllowUpgradesWithUnsupportedTPMOrCPU".
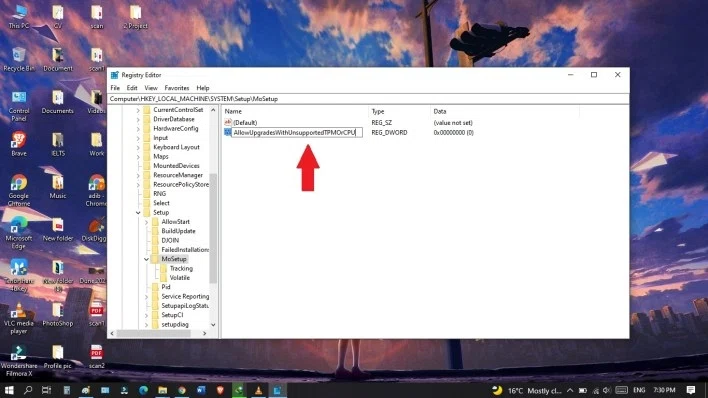
Step 6. Next double click on the value that you just created, and enter 1 in the Value data field and click OK.

Then close the Registry Editor. Now your PC should be able to install Windows 11 successfully. But in some cases when you open the Windwos 11 installer setup you will encounter the same error. If your pc is good to continue the process then it's fine. If you encountered the error then you need to do one more thing. You need to delete the "appraiserres.dll" file.
To delete "appraiserres.dll" file you need to follow the steps below:
1. First right click your ISO file and select "mount" option to mount the Windows 11 ISO file.
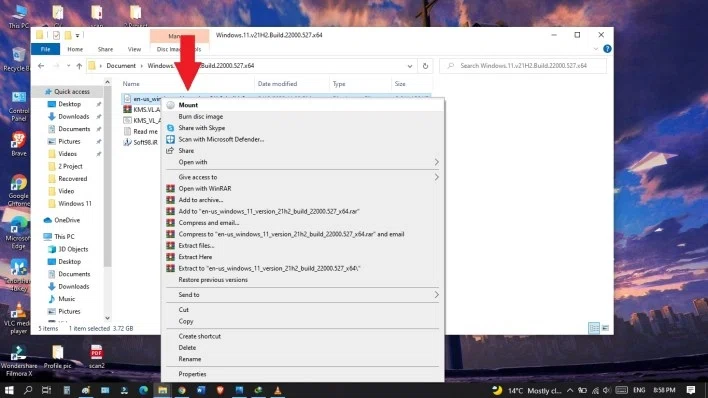
2. Then open the source folder, once you opened the source folder find "appraiserres.dll" file and delete it.

3. Remember that there is a file called appraiser.dll and you should not mistakenly delete it instead of "appraiserres.dll". The two files are different in size also. The file you should not delete is 2133 KB and the "appraiserres.dll" file that actually you should delete is 193KB.
If you followed the steps above, you need to know that we are done. That's it. That was all that we had to change in the Registry Editor and it was actually pretty easy. Now you can install Windows 11 on your unsupported PC or hardware successfully. The process is completely the same as you would install Windows 10 on your pc.
Install Windows 11 on Unsupported PC using Rufus
Rufus is a free, open-source tool that helps in create installation USB for various versions of Windows operating system including Windows 11. However, it also helps in creating an installation USB that can bypass the Windows 11 system requirement checks for TPM and CPU.
You need a blank USB for this process of atleast 16GB in size. Once you have created the USB, you can boot the computer using this USB or click on the setup file for Windows 11 in the USB to start installing Windows 11. The process is very simple. However, for this process to work you need a USB flash drive of atleast 16GB in size, and secondly, this is not quite suitable if you are trying to install Windows 11 on a virtual machine, in which case installing Windows 11 from an ISO file would be more appropriate. If that's not the case with you, follow the below method to start creating the installation USB.
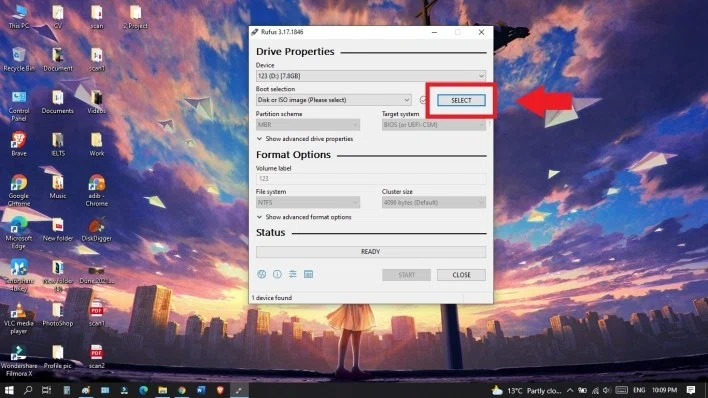
Step 1. Download Rufus from https://rufus.ie/en/, unzip it on your desktop and launch the tool after inserting the USB in the computer.
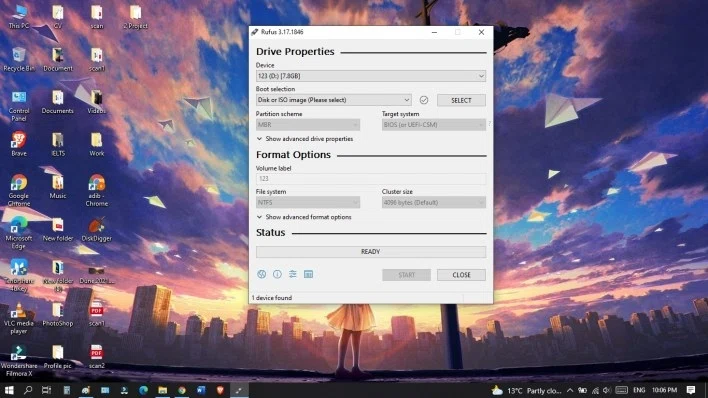
Step 2. Select the blank USB drive from the dropdown in the Device section.
Step 3. Next, under Boot selection, choose the option for Disk or ISO image, then from the next dropdown beside it click on SECECT button..
Step 4. From the pop-up choose Windows 11 as the version, under the dropdown for Release choose the latest release of Windows 11, from Edition select Windows 11 Home/Pro, from the Language dropdown select your language, and finally from the architecture dropdown select x64. Once done, click on the Download button on this box.
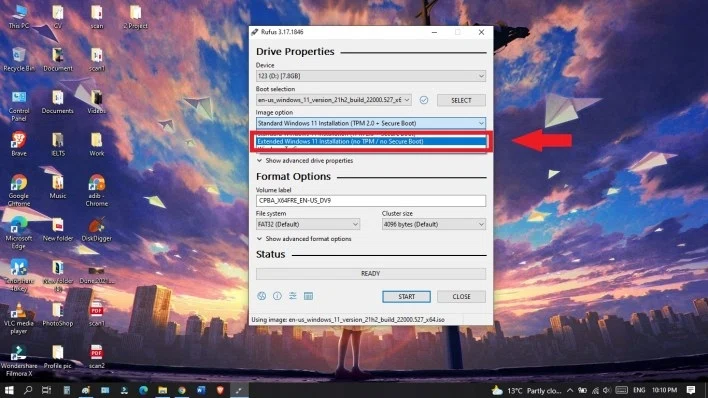
Step 5. It will take some time for Rufus to download the Windows 11 ISO file. Once done, under the Image option dropdown, select the option Extended Windows 11 Installation to disable TPM, Secure Boot and the 8GB of RAM.
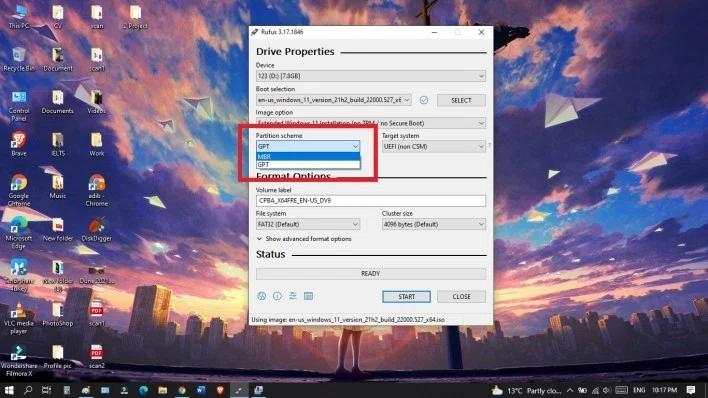
Step 6. In the partition scheme, it's up to you whether you select the MBR or GPT, select one and adjust the rest of the options according o your pc requirements.
Leave the rest of the settings to default. Once done, click on the START button. This should start the process of creating the installation USB. Once the process completes, you can close Rufus, and start the installing Windows 11.
As mentioned earlier, you can either do a fresh install by booting from the USB, or double click on the setup.exe file from the USB in case you want to do an in-place install from an existing Windows 10 installation. Please note that you may have to disable secure-boot in your computer's BIOS if you get any errors while installing.
To Sum Up
We would suggest you to go through each of the methods first before you jump in to install Windows 11 on an unsupported PC and hardware. That way you will have a good understanding of what you are doing, and what are the pros and cons for each process. This will help you in choose the right method for you.