Windows 11 has been released for some time now, but it's understood that a lot of users cannot install or upgrade to Windows 11 smoothly due to the software and hardware compatibility. When you finish the installation or upgrade and restart your computer, it may suddenly failed to boot into Windows or appearbluescreen of death. All of these problems refer to the failure of the upgrade because it could lead to the required services or programs not being installed.
For Mac computer, the built-in Boot Camp sometimes does not play its role in making a bootable USB from ISO image and there may be many unknown errors. In this section, we will study how to create a Windows 11 bootable USB without using Boot camp.
A Summary of Our Key Findings
1. In our survey, we found that over 57.%32 of users have upgraded to Windows 11, while 22.5% of users are unwilling to upgrade to Windows 11.
2. For people who have both a Mac and a Windows computer, about 34.7% of Mac user are willing and trying to install Windows 11 on their Windows computer.
3. Only 18.5% of Mac users used Boot Camp application to created a Windows 11 bootable USB installer. And 33.7% of Mac users choose other third-party tools instead.
4. Your computer must meet the requirements for upgrading Windows 11, and what's the requirement Microsoft do notdefinethestandards for that.
5. To our happiness, there are over 48.9% of users thinking it is necessary to always have a bootable USB installer so that it can help repair the system if needed.
Requirements for Upgrading to Windows 11
According the latest news from Microsoft, in order to upgrade to Windows 11, check that you have.
- Your computer should equip with at least 1 GHz or faster 64-bit dual-core or multi-core processor.
- At least 4GB RAM, and 64 GB storage in your system disk.
- Must supports UEFI boot mode, TPM 2.0, DirectX 12 or WDDM 2.0 driver.
- Windows 11 also has requirements for the computer monitor, which requires a high-definition (720P) monitor with a diagonal line larger than 9 inches, and each color channel is 8 bits.
What If the Windows 11 Upgrade Failes
It should be noted that there are still plenty of users may encounterthe issue "your computer doesn't meet Windows 11's minimal hardware requirements" and other glitches. If the official upgrade method doesn't work for you, you can try to create a Windows 11 bootable USB installer from an ISO image. Checking the following methods.
Create Windows 11 Bootable USB from ISO on macOS via WonderISO
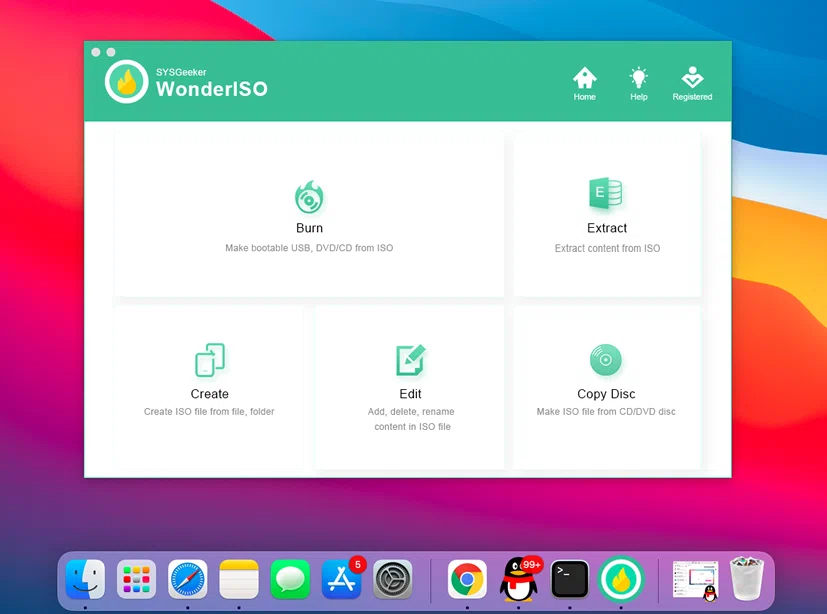
Wonderiso is a GUI software that can help you create a Windows 11 bootable USB installer for a large variety of ISOs in a straightforward way without running complex commands. This tool fully supports for creating MBR and UEFI boot for different computers, so don't be afraid that your bootable USB drive failed to boot from a UEFI + GPT computer. WoderISO tool is a comprehensive software which provides multiple functions: Burn ISO, Create ISO, Extract ISO, Editor ISO and Copy from DISC, but BURN is the most used feature in the system re-installation.
The prime benefit is that it can automatically split the install.wim file that over 4GB into a small piece, it's pretty safe and does not carry any bugs in the system.
What You Need:
- A Mac computer running macOS (version 10.12, 11, or later, even mac Big sur).
- Windows 11 ISO image file.
- A USB flash drive with 16GB of storage.
- WonderISO for Mac software. You can download below.
STEPS: Let's see how to use WonderISO to create bootable USB Windows 11 on Mac Big sure 11.2.
Step 1. Download the WonderISO for Mac version and install it on your Mac computer. It supports all macOS version including macOS 10.2 - macOS Big Sur 11.4. After installed, run it.
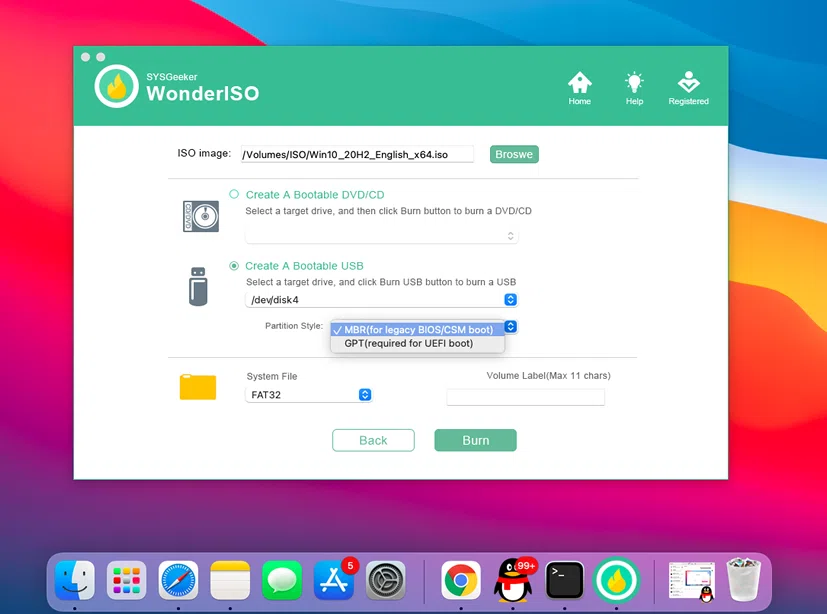
Step 2. Select "BURN" option, then enter the BURN setting screen.
- Click Browse to load your Windows 11 ISO file.
- Check the option "Create A Bootable USB".
- Select a MRB or GPT booting mode in the dropdown list.
- Select FAT32 as the system file.
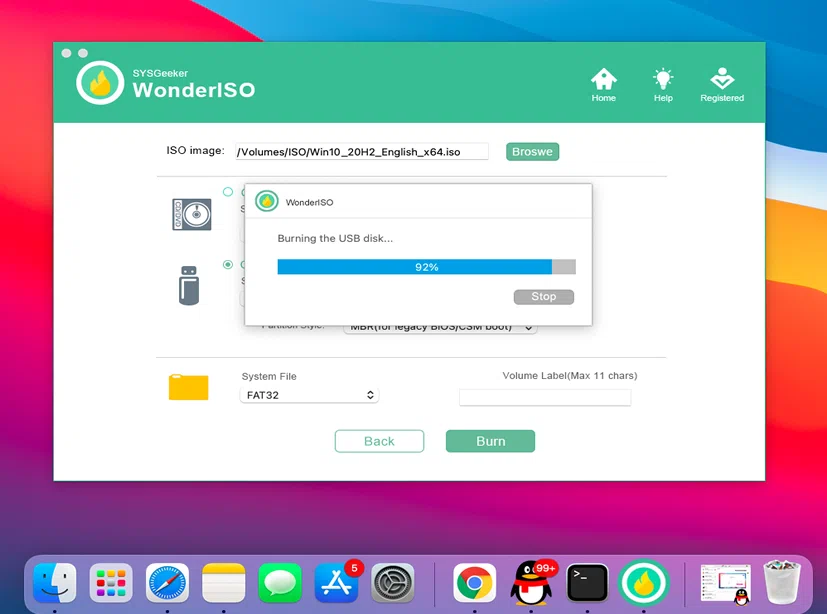
Step 3. Once you go through the settings, click the BURN button. Then you will USB will be formatted as FAT 32 and the Windows 11 ISO will then be copied onto the USB so you can use it to boot.
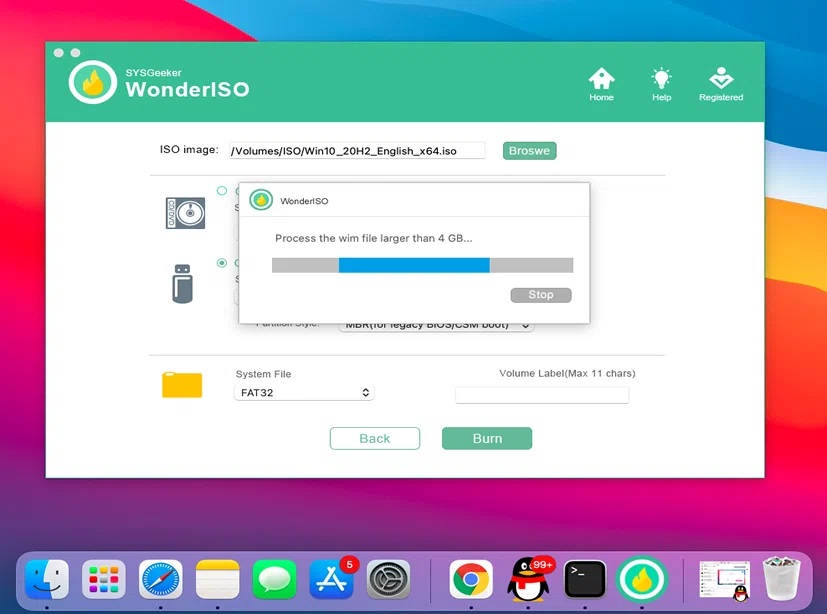
Step 4. When the files copying is finished, next, the program will automaticallyprocess the larger file (install.wim) by splitting it into two small piece. It took me about 8 minutes to finish the file splitting. Don't touch your USB drive to avoidbreaking thefile splitting.
After a while, it should show "Burning successfully" in a new window. then eject your bootable USB drive and connect to your computer for installing Windows 11.
Create Windows 11 Bootable USB from ISO on macOS using Terminal
If you googled you may find over 99% of the solutions either use Bootcamp or or are geared towards dual-booting macOS & Windows, which is not a good solution for you, so we I will not recommend Boot Camp as you know it may encounter errors. Conversely, I will show you exactly how I create a Windows 11 bootable USB with terminal/command prompt, it works but a little difficult as it requires one third party tool calledwimlib. (For Windows 10 ISO, click here)
Before proceeding, you'll need the following:
- A Mac computer running macOS (version 10.12, 11, or later).
- Windows 11 ISO image file.
- A USB flash drive with 16GB of storage.
Step 1. Open a Terminal
Connect your USB drive to your mac computer, then open the Terminal utility.
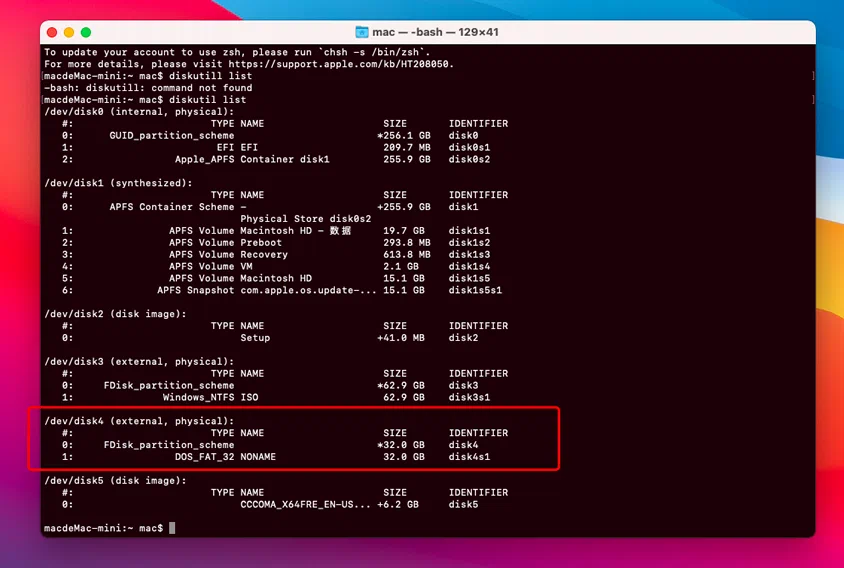
Step 2. Identify Your USB Drive
First of all, find out which device is your USB stick, because Mac shows USB identifier in a different name than Windows. So, your USB drive's name may be /dev/disk2or/dev/disk3. Just type the diskutil list, this command will show a list attached disk drives on your Mac.
$ diskutil list
Be careful to check which is the path of your USB drive sticks. In my case, the USB named as disk4 with the size of 34 GB.
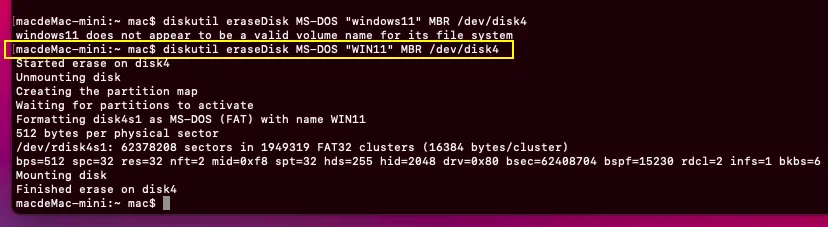
Step 3. Format Your USB Drive
Now, we need to format the USB drive into FAT or FAT 32 as this is the widely compatible file system. And you need to create a name for the drive for later use. Here's the command:
$ diskutil eraseDisk MS-DOS WIN11 MBR /dev/disk4
Mount Windows 11 ISO File
Now, we need to mount the Window 11 ISO image, assume that you've downloaded the Windows 11 ISO image in a download folder. Type the following command hdiutil mount in the Terminal, then drag the Windows 11 ISO file to the Terminal.
$ hdiutil mount ~/Downloads/Win11_English_x64.iso
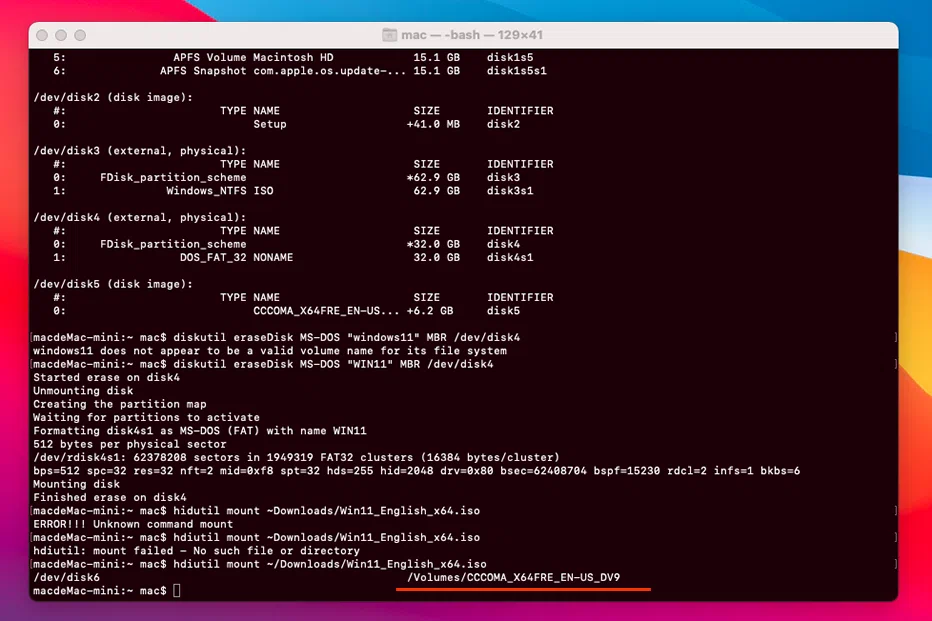
After typed the command above, run it. Once the Windows 11 ISO is mounted it will print the path of the mounted ISO image and volume name, The path name will be something like: /Volumes/CCCOMA_X64FRE_EN-GB_DV9. We need this printed path in the next step.
Copy Win 11 ISO Files to USB Flash
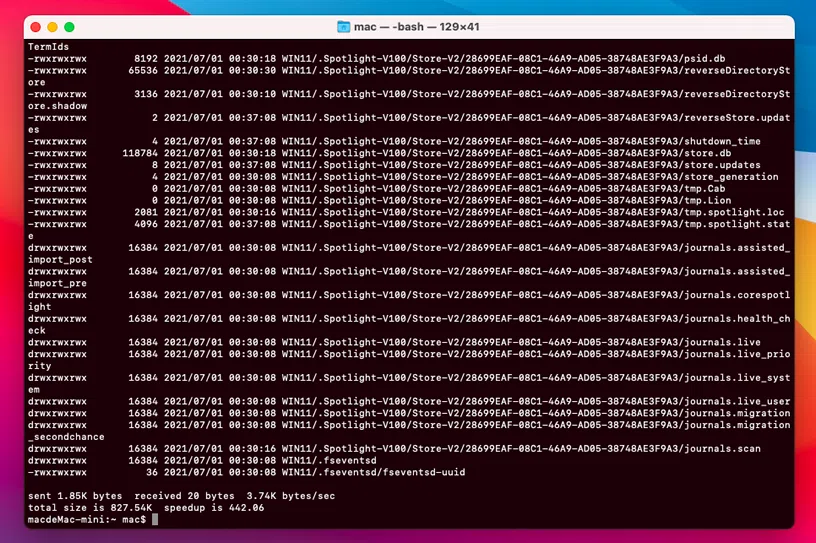
Finally, copy all the ISO files from Windows 11 to your USB drive. Here's the command:
$ rsync -avh --progress --exclude=sources/install.wim /Volumes/CCCOMA_X64FRE_EN-US_DV9/ /Volumes/WIN10
But it's important to notice that install.wim file must be excluded to copy if it's larger than 4 GB. As mentioned earlier, FAT32 has a restriction that each file size can be 4GB or less. It is obvious that the Windows 11 install.wim file will be larger than 4GB, but don't worry. we can deal with it by wimlib tool.
Handle Install.wim file larger than 4GB
If you ignore the fact that install.wim file larger than 4 GB, you will definitely receive an error message "cp: /Volumes/W10/sources/install.wim: File too large". but this is not the problem, it's easy to fix. You will need to wimlib tool to split this larger file into 2 pieces. But first you need to install the Homebrew tool.
Step 1. Install Homebrew & Wimlib
If your mac didn't install the Homebrew, just run the following command to download and install it on your Mac.
$ /bin/bash -c "$(curl -fsSL https://raw.githubusercontent.com/Homebrew/install/master/install.sh)"
After the Homebrew installed successfully, reopen your Terminal utility, then run the command brew install wimlib to install the wimlib tool.
$ brew install wimlib
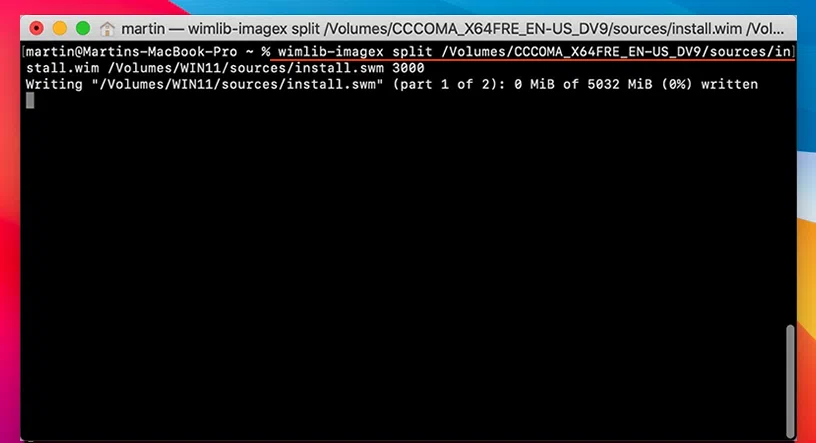
Step 2. Split the install.wim file to 2 pieces.
Split the larger install.wim file from the .iso image to the USB disk by runing the following command.
wimlib-imagex split /Volumes//Volumes/CCCOMA_X64FRE_EN-GB_DV9/sources/install.wim /Volumes/W10/sources/install.swm 3000
Unmount USB Drive
Now we need to wait while the divided files will be copied to your USB drive, this may take something from minutes to hours based on your USB writing speed. In my case, when I first did this with a USB 2.0, it took about 2 hours. But with a USB 3.0 or external hard drive it only took 18 minutes.
Finally, run the command diskutil unmount $DRIVE_MOUNT. After that, your Windows 11 bootable USB installer has been created successfully, and now you can install Windows 11 on your computer.
diskutil unmount $DRIVE_MOUNT
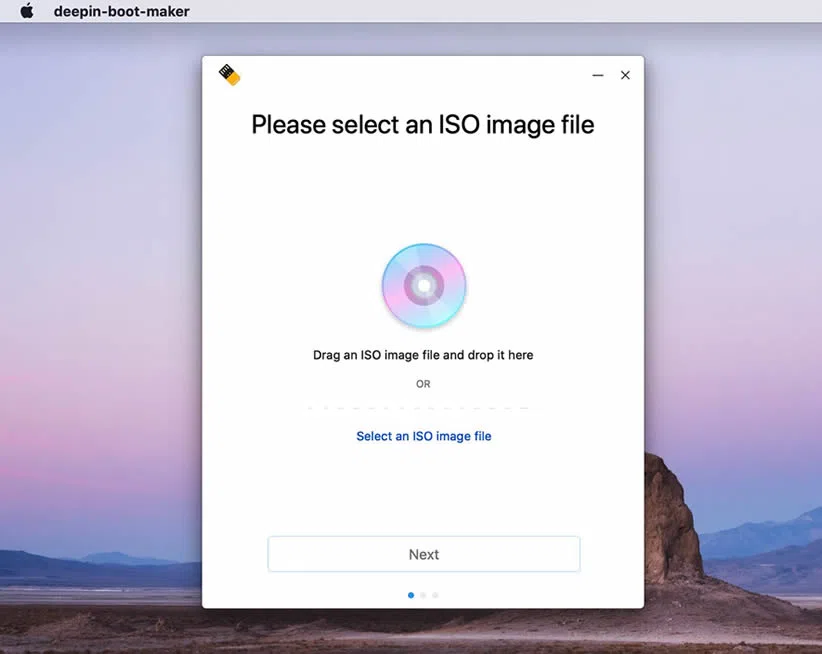
Create Windows 11 Bootable USB from ISO using Deepin Boot Maker
Deepin Boot Maker is currently one of best open source applications that allows you to make a Windows 11 bootable USB from ISO image quickly. It only provides parts of Rufus's functionality, The interface is pretty decent and simplest as compared to other competitors like Rufus, You don't need to set anything up, except to import the ISO file and click the Burn button. It doesn't allows you to specify a partition scheme (MBR or GPT), file system, cluster size.
I have no idea if such tool will help you succeed in creating Windows 11 bootable USB, it that might not be working for you. But in my test, after many attempts I was finally able to make a bootable USB from a Windows 11 ISO. Since there are no arguments, it is error-prone. On a side note, the tool should work for all Ubuntu live install ISO, worth a try!
STEPS
- After installed the tool on your Mac, launch it.
- Click "..." button to import your Windows 11 ISO image file.
- Connect your USB flash drive, it will show the Drive name in the list.
- Check Traditional Mode if your computer uses MBR boot method.
- Click Burn button to start writing ISO file.
NOTE:
1. In my test, It failed to start on my macOS Big sur, but it works on macOS 15.4.
2. It does not require any dependencies.
3. The success rate is less than 40%.
Create A Windows 11 Bootable USB Installer using BalenaEtcher
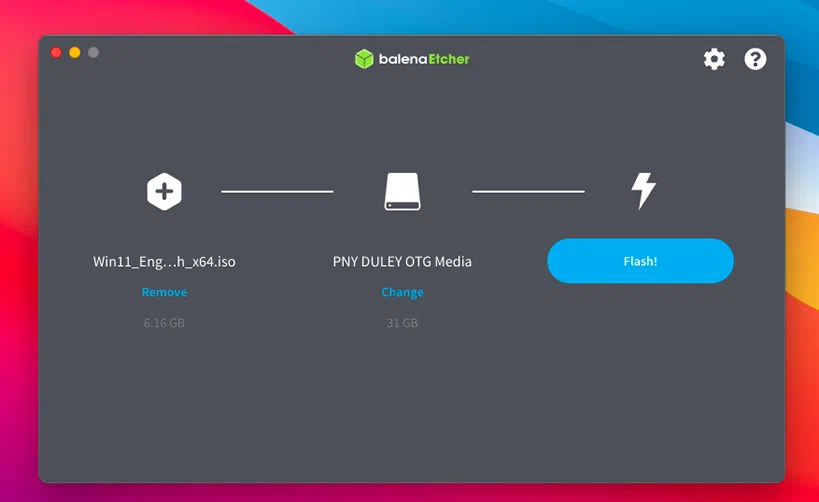
Etcher is a open-source tool designed to help users securely write images files to USB drive and SD card, and make them to be bootable. This tool features a user-friendly interface that consists of a single window where you can clearly add the image and select USB drive. Another advantage is that it supports multiple images files including ISO, IMG or ZIP file formats, but it doesn't provides some useful configuration options like Rufus.
However, in my test, this program was unsuccessfully when I try to burn a bootable Windows 11 ISO file to a USB 2.0, although it didn't prompt any errors when writing ISO, but it says "the disk is unreadable" when verifying and force me to format it every time.
STEPS
- Download and install the Etcher tool on your Mac.
- Browse your Windows 11 ISO file, the program may prompt you an error messages "Missing partition table", just ignore it and continue.
- Select your USB drive from the list and click "Flash" button to start.
Comparison of The Success Rate of Each Method
The following table objectively presents the core features and and test metrics for each software, hope it is helpful to you.
| Items |
||||
|---|---|---|---|---|
Support OS |
Windows 7,8,10,11 | Windows xp,7,8,10,11,server | Windows 7/8/10/1 | Windows 10, 11 and macOS, Linux |
Time Used |
30 - 40 minutes | 10 -15 minutes | 30-35 minutes | 20 - 30 minutes |
Difficulty |
High difficulty( No GUI) | Very Easy (GUI) | Easy | Easy (GUI) |
Compatibility |
macOS | Windows and macOS | macOS | Windows, maOS and Linux |
Success Rate |
69% | 99% | 72% | 76% |
Conclusion
Whatever you want to install new Windows system, troubleshoot or perform diagnostics, having a bootable installation media should be a quick and straightforward solution for any system issues. If you are looking for a hassle-free tool to help you create a Windows 11 bootable USB from ISO on macOS without any complications, I think you should consider to try WonderISO for Mac tool.