Wait, is that a new Windows version, Windows To Go?
No. Windows To Go is a very useful feature available since Windows 8, it allows the OS to be copied into the USB device, a flash drive, or a portable hard drive so that you can run the OS from the device itself.
Table of Contents
Why I Need to Create A Windows To Go USB?
Simple. Let’s say you are working on a project with highly sensitive data that you cannot share over email. You create a Windows To Go drive which copies the OS and carry it to work. Next time you want to work on that project, simply boot from the USB and start working! You can use Windows To Go USB drive even on a public computer without having to worry about security since you are not login in the computer, but booting directly from the USB drive.
This was possible on a number of Linux distros for a long time. However, Microsoft made it available for Windows users since Windows 8.
How to Create A Windows To Go USB Drive?
You’ll need a couple of things to create a Windows To Go USB drive. If you go by the official Microsoft way, you will need a Windows To Go certified USB drive, which costs a ton of money. Also, they would want you to use USB 3.0 only. So, what do you do?
Worry not, use a third-party software to create this USB drive. There are a couple of options for the same. I’ll start off with the best, AnyWinGo. However, you can also use Rufus, WinToBootic, or ISO2Disc. Now remember, all of these are free software. First, let’s see how we can create a Windows To Go USB using AnyWinGo.
Using AnyWinGo (Works with non-cerfitied USB)
AnyWinGo - This enables you to install a fully function OS in a USB drive or an external hard drive along with all it’s configurations. You can create Windows To Go drive using an Windows image (it can be in ISO, WIM, ESD, or VHDX format), or your can simply clone your native Windows installation on an USB drive. AnyWinGo fully supports creating a Windows To Go drive with all Editions of Windows 10/8/8.1 including Windows Home, Professional, Education and Enterprise on a non-cerfitied USB drives. Also, using AnyWinGo is super easy! Here’s how you can use it:
Step 1. Download AnyWinGo from the link above, then install the software and then launch it. You’ll get the option to create a Windows To Go USB drive for both Windows or Mac.
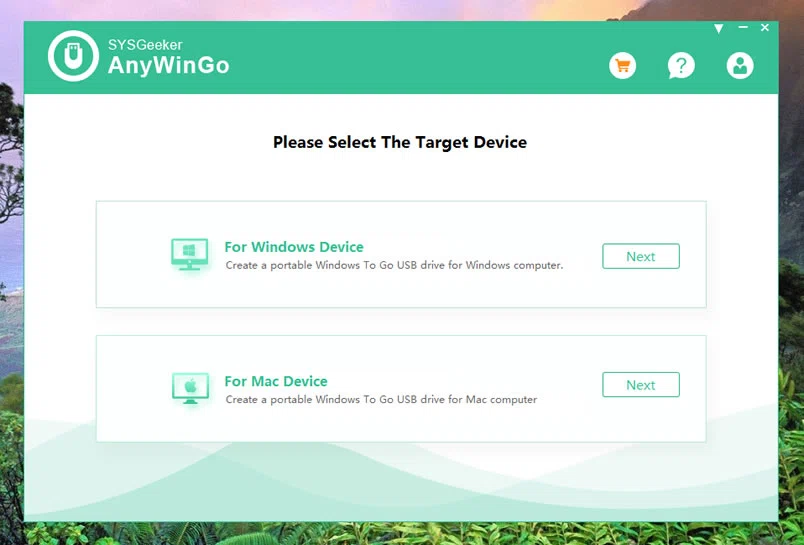
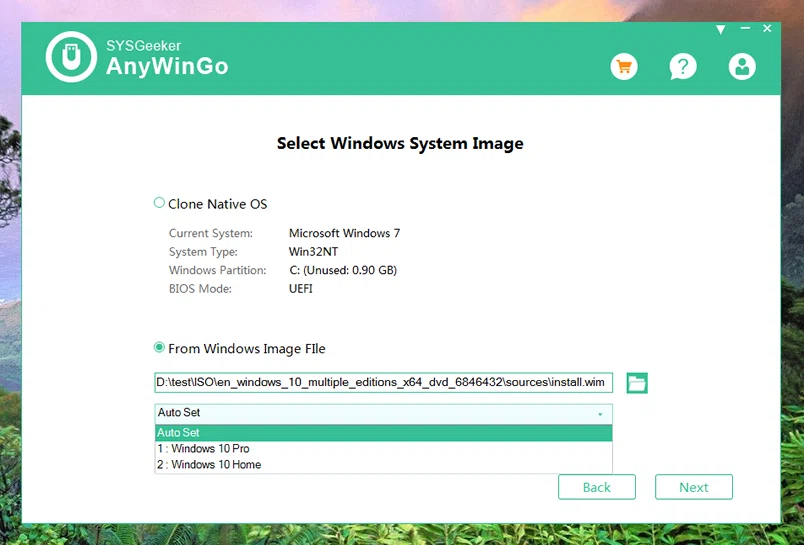
Step 2. Here, we will select Windows device and click on next. Now you will get the option to either clone your native Windows installation, or create a Windows To Go drive from an ISO image. Choose the second option, select the file and click on Next.
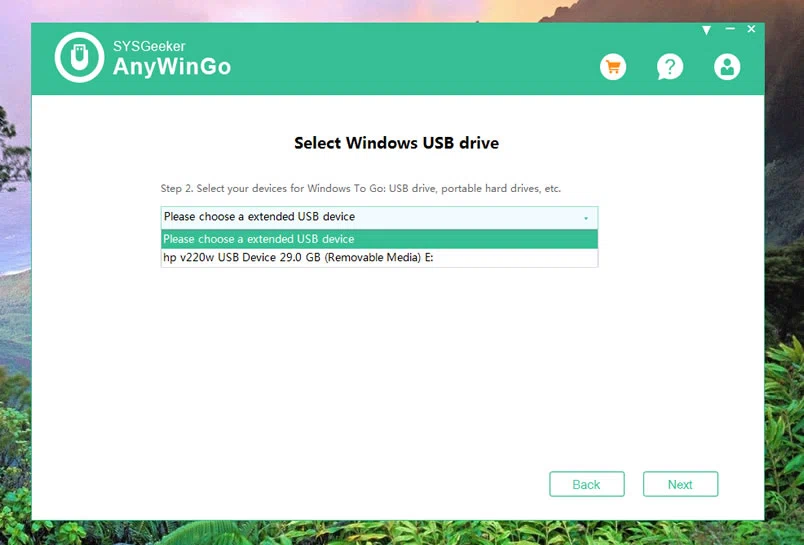
Step 3. Now select the drive using which you would like to create the Windows To Go drive from the dropdown list, and click on Next. Please remember, the drive needs to have at least 32GB of free space. It can be a non-certified drive, and a USB 3.0 or a 2.0 drive. However, using a USB 2.0 drive will make the process very slow, so use it at your own discretion:
Here, I will recommend some additional non-certified drives based on price that also have a good read performance for WTG.
- $29 64GB Kingston DataTraveler Elite G2 - up to 180MB/s reads and 70MB/s writes
- $56 128GB SanDisk Extreme Pro - up to 420MB/s reads and 380MB/s writes
- $138 1TB Samsung T5 Portable SSD - up to 540MB/s reads and writes
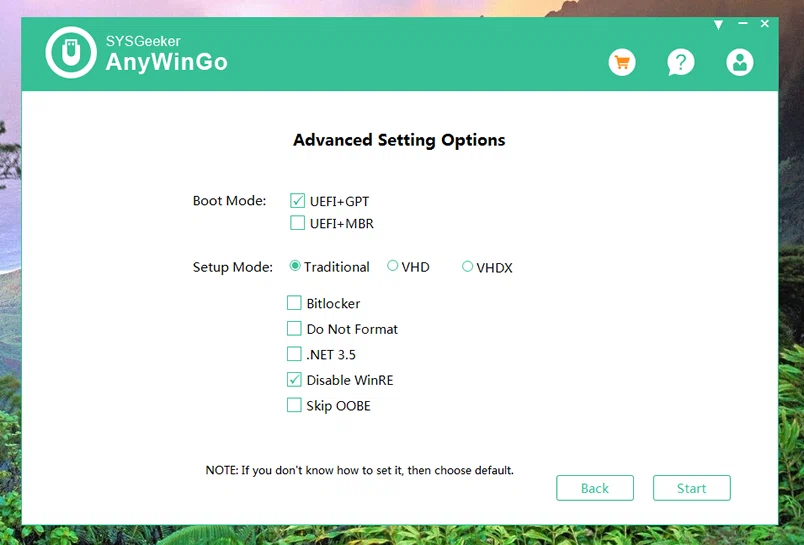
Step 4. Now you get to select the boot mode and the setup mode. Please note that the "UEFI + MBR" option is for legacy support, it works on older PCs. For setup mode, select tradition. For the other options, if you are not sure, then choose the default option that is already selected. Finally, click on the Start button to start the process:
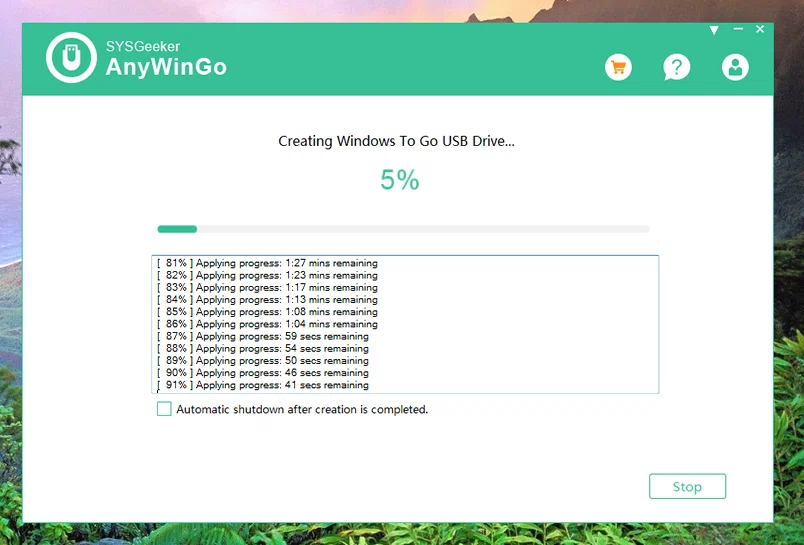
Step 5. When you click Start button, the installation will begin and would take around 20-30 minutes depending on the write speed of your USB drive.
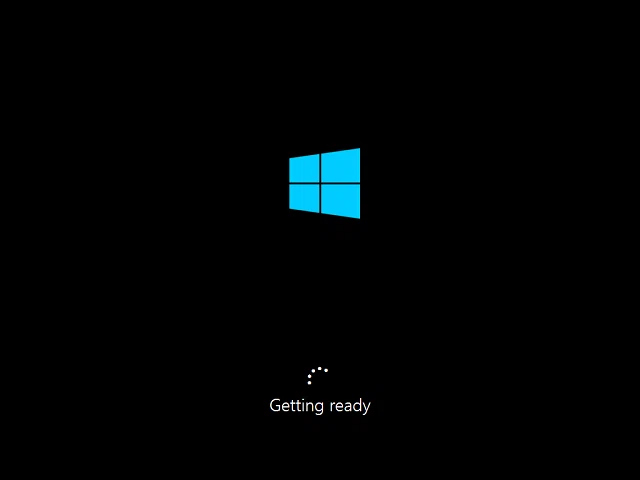
Step 6. Once completed, you can insert it in any other computer and boot from it, you may have to change the BIOS setting to boot from USB drive. The first time you will have to go through a setup process, however, if you boot from USB once again on the same computer it will skip this setup process and go directly to the desktop.
In this routine test, we are very satisfied with its performance as it created a Windows To Go with Windows 10 Pro Edition successfully on a non-certified USB drive without popping up any errors.
Pros:
- Easy to use and high success rate.
- Clone your operating system in just three simple steps.
- The portable Windows To Go can be run on a Mac computer.
- Support both MBR and UEIF boot.
- Create Windows To Go on Non-Certified USB drive.
- Support any editions of Windows 10/8 and Windows Server 2019/2016/2012/2010/2008 R2.
See this video tutorial:
Using Rufus
Rufus is another utility software that let’s you do the same thing as of AnyWinGo, albeit, with much less flexibility. But it seems that Rufus 2.3 or later editions removed the function to create a Windows To Go drive with the Windows 10 ISO image that downloaded from Media Creation tool. Here’s how you can create a Windows To Go USB drive using Rufus:
Things You'll Need
- Windows To Go Certified USB stick with 32 GB or above.
- Rufus v2.2+
- A Windows ISO Image file.
Step 1. Download Rufus from it’s website using the below link: https://rufus.ie/en/
Step 2. There is a portable version available, you can simply download it and start using it. The portable version does not need to be installed. If you have downloaded the regular version, install the same on your computer by following the instructions on the screen. Once done, launch Rufus when you will see the following screen:
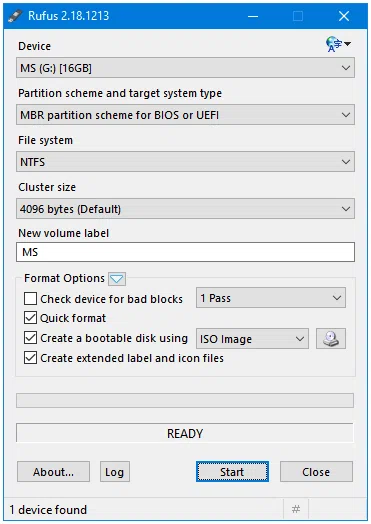
Step 3. Connect your USB drived or SSD to computer then select your WTG USB drive from the drop-down list.
Step 4. Next, you will need to select a partition scheme for your WTG drive. Under Partition scheme and target system type, select MBR partition scheme for BIOS or UEFI based on your target computer. For example, if you want to boot your WTG drive in a UEFI-based computer, then you have to select the "GPT partition scheme for UEFI computer".
Step 5. For the system file, there we recommend you choosing NTFS, don’t use FAT32 as it has a file limit of 4 GB, which will cause production failure.
Step 6. And skip the Cluster size section or keep it as default setting.
Step 7. Now, click the browse icon to load your Windows ISO image to program. And select Windows To Go under the Format Options. Then click the Start button to start creating a portable Windows to Go USB drive.
Step 8. A warning will pop up to remind you "Your USB drive will be erased", just click OK button to continue.
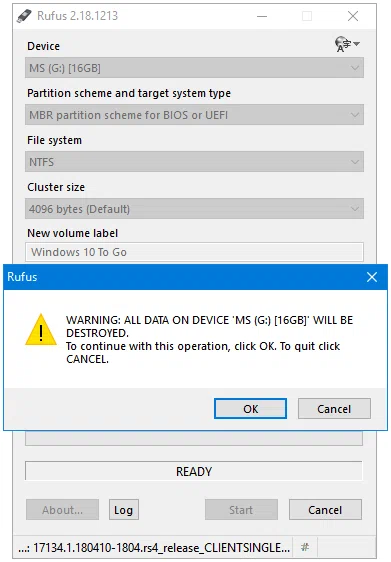
Step 9. Now, wait for rufus to make your Windows to Go drive. It may generally take 2 to 4 hours to complete this task, depending on your USB write speed.
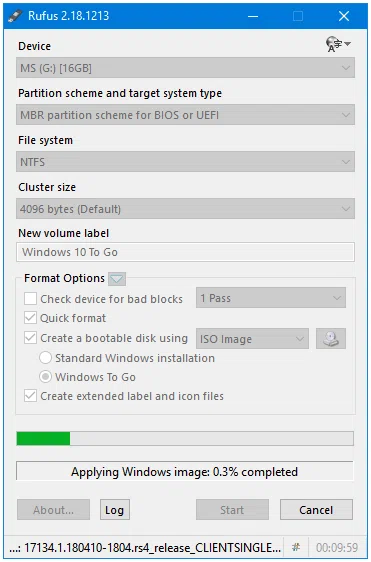
In our test computer, Rufus took about 1.5 hours to create a non-certified Windows to Go USB drive windows 10.
Using WinToBootic
WinToBootic is a lightweight application that let’s you create Windows To Go USB drive with ease. They have sacrificed flexibility for ease of use. Let’s see how we can create the USB drive using WinToBootic:
Step 1. WinToBootic does not have a dedicated website of its own, you can download it from the FileCroco website from this link.
Step 2. This does not require any installation, so simply download the file, and double click on the executable file to run it. Once you run it, it will show the below screen.
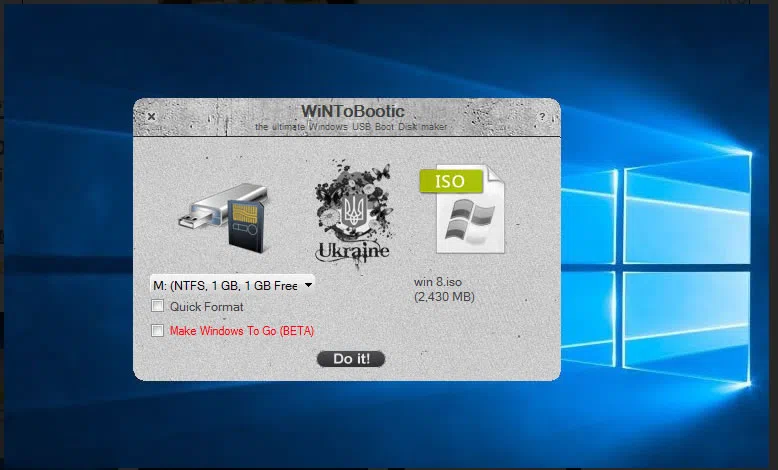
Step 3. As you can see, WinToBootic hard has any options unlike AnyWinGo. Simply select the USB drive from the dropdown on the left, then select Quick Format by checking the checkbox beside it. Once done, click on Do it! This will format the USB drive. Make sure you select the correct USB drive, otherwise you will lose all data from any other drive that you select.
Step 4. Once the formatting is done, click on the green arrow on the right side and select the ISO image. And check the option "Make Windows To Go (BETA), Then click Do it button to start to create a Windows to Go usb drive.
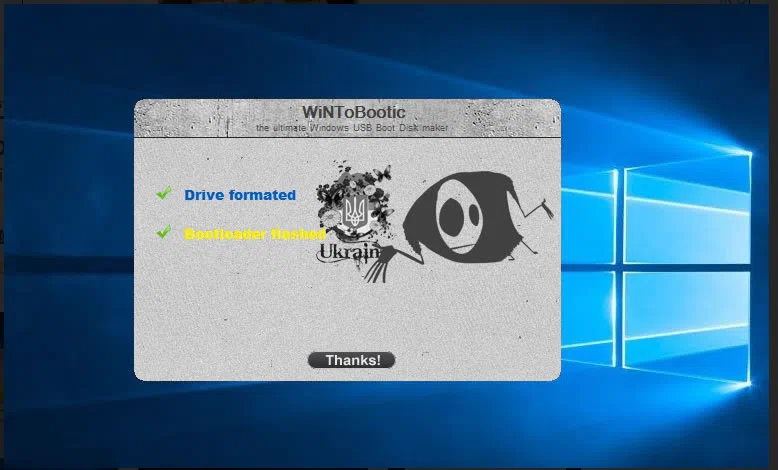
Step 5. Once complete, it will come to the below screen. Click on the Thanks button and we’re done!
NOTE:
Remember, to use this software you need to have .NET framework already installed on your computer. There is no official support for this software.
Using ISO2Disc
Like WinToBootic, ISO2Disc is a lightweight application that let’s you create a Windows To Go bootable USB. You do not have the option to clone your native Windows installation here either, which is a major drawback if you ask me. The user interface is extremely simple, and it shouldn’t take you more than 5 minutes to get started with this even if you haven’t used any similar software before. Let’s see how we can use ISO2Disc to create our Windows To Go USB drive:
Step 1. Once again, like WinToBootic, I could not find any official website for ISO2Disc. You can download the file here.
Step 2. Once you have downloaded it, setup the software by following the instructions on the screen.
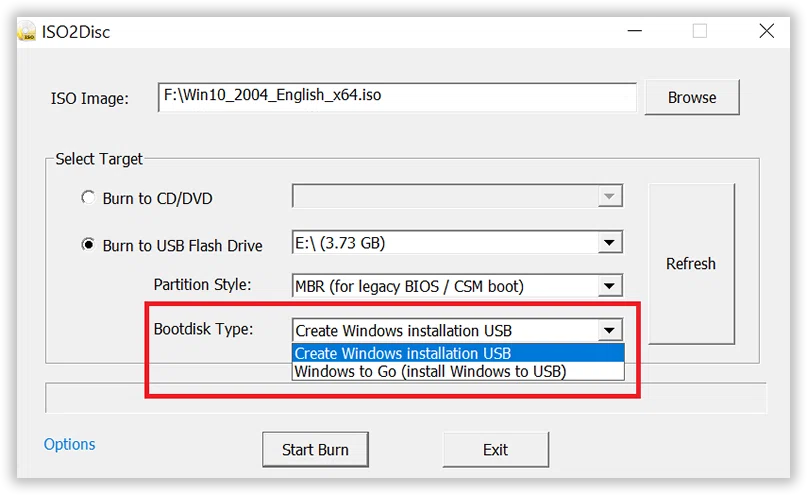
Step 3. After installing it, run ISO2Disc. You will be presented with a screen from where you would be able to select the ISO image and the USB drive. For Burn to USB Flash Drive option, select the USB Flash Drive, then in Partition Style select MBR for old computers, and UEFI for modern computers. Once selected, simply press the Start button and it’s done!
Conclusion
As I had mentioned earlier, out of all these options I would always prefer AnyWinGo. It has more flexibility by giving you more options including 2 boot modes for support both modern and legacy computers, you can create a drive for not only Windows but even for a Max, also it is more reliable compared to the other options as it has a dedicated support page, detailed FAQ pages. So what are you waiting for, download AnyWinGo and take your Windows with you!
Post to ISO Topic