If all your work resides on an external hard drive which you have the move between a Windows PC and a Mac, you would know how difficult it can be considering Mac does not write on Windows-formatted NTFS drives, it can only read from them. I am a video editor, and I have been facing this difficulty for a long time. So, I did a bit of research to find permanent solutions to this problem. But what's the point of keeping these solutions to myself, I am sure there are other users out there who are facing similar issues. Which is why I am writing this tutorial on how you can read and write on NTFS hard drives on Mac, so that you won't have to face the same problems that I did.
Why I cannot Read and Write NTFS Drive on macOS?
You can actually read an NTFS hard drive on macOS, but you won't be able to write anything to it. So, the hard drive won't be of much use to you on your Mac. The reason behind this problem is because macOS cannot recognize the NTFS format, so the writing, editing and deleting feature wasn't available to macOS, but you can still be able to read the NTFS-formatted drive.
Now, you might be wondering what is NTFS. Well, every operating system (macOS, Windows, Linux) has their own process of organizing stored files on disk drives. They also have specifications as to what information can be attached to files, such as file permissions, names of the files, attributes etc. These methods are driven by guidelines mentioned in the file system of that operating system. For Windows OS it is the NTFS (New Technology File System), for macOS it is the APFS or macOS Extended file system.
In the latest Macs, Apple still offers no solutions for the NTFS read-only issue, the No-writing feature is still permitted in the new macOS 11 and macOS 12.
Ways to Read and Write NTFS Drive on macOS
Format NTFS to FAT
There are multiple ways to read and write NTFS drives on Mac. The simplest way is by formatting the NTFS hard drive with FAT file system, which is recognized by both Windows and Mac.
However, there's a catch. The FAT file system is pretty old, and is riddled with disadvantages. Which is why it was replaced with NTFS in the first place. For example, FAT supports a maximum file size of 4GB and a hard drive size of 2TB. This is a major drawback since most of the work-related files are way more than 4GB in size, even a 4k movie is larger than that in size. Moreover, FAT can get corrupted easily. So, if you don't take a backup of your files, relying on FAT is not a good idea. And the final nail on the coffin is that FAT does not support file permissions, so anyone can read and modify the files created by you.
Thankfully, this is not the only way for you to be able to read and write NTFS drive on Mac.
Enable NTFS Write Support Using Terminal
When I said that Mac does not allow for you to write on an NTFS hard drive, I was technically wrong. It does have a way to enable NTFS write support. However, it is an experimental feature on Mac and is accompanied with the necessary risks since we would be disabling System Integrity Protection (SIP) of your Mac. Moreover, this method can corrupt the native hard drive of you Mac and lead to complete data loss. So, think twice before using this method.
Step 1. Open a Terminal in your Mac by going to Finder > Applications > Utilities > Terminal.
Step 2. Once the Terminal window opens, type the following command and press Return to open the fstab file in the nano editor.
sudo nano /etc/fstab

Step 3. Once the fstab file opens in the nano editor, add the following line of code in there. Remember to replace NTFS_DRIVE with the name of your NTFS drive. Also, this name should not contain any spaced.
LABEL=NTFS_DRIVE none ntfs rw,auto,nobrowse
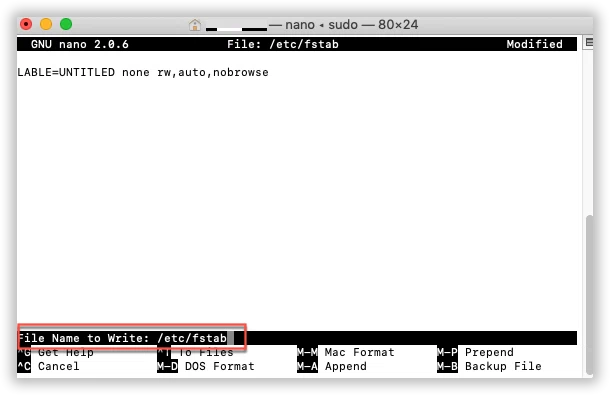
Step 4. Now, press Ctrl+O and Ctrl+X to save the changes to the fstab file and close the nano editor.
Step 5. If your NTFS drive is already plugged in to your Mac, unplug it and restart your Mac.
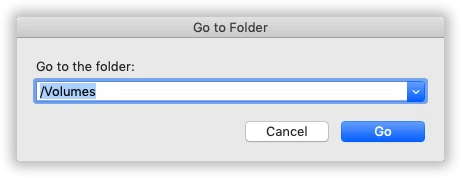
Step 6. Once the Mac restarts, plug in the NTFS drive, and you'll be able to view it under the "/Volumes" directory. Remember, the drive will not show up on the desktop automatically like it normally does. For separate NTFS drives, you need to add multiple lines in the fstab file.
This should allow you full read and write access to your NTFS disk on the Mac. In fact, Terminal is an alternative way to find and remove the large files and folders on your Mac computer without losing data. But sometimes it is risky if you're not familiar with command prompt, and most people would stop here.
Pros
- Enables read write support for NTFS drive on Mac without installing any 3rd party software.
Cons
- Disarms System Integrity Protection of your Mac.
- Need to repeat process for every new drive.
- NTFS drive names cannot contain spaces.
- NTFS drives do not show up on the desktop.
Read and Write NTFS Drives using NTFS for Mac
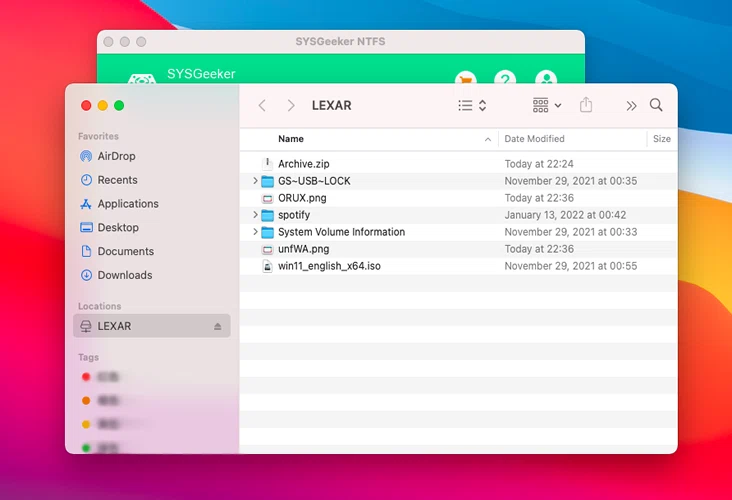
If you ask me, the experimental feature is quite dubious since it compromises the security of my Mac. And security is the main reason we all use a Mac in the first place, isn't it? So, let's get that method out of the way and take a look at this 3rd party utility called SYSGeeker NTFS for Mac. This amazing utility not only support full read and write NTFS drives on Mac, but it also has option to format and repair NTFS drives, extends support till macOS Monterey, and is compatible with Apple Silicon M1 chips. Once installed, the app will mount and access your NTFS-formatted drives and perform the most common volume operations like mount, unmount, and verify.
Step 1. Download and install SYSGeeker NTFS for Mac on your macOS, and then launch the tool. Be sure to Allow System Extension when the option comes on your screen. You may need to restart your compute to take it effect.
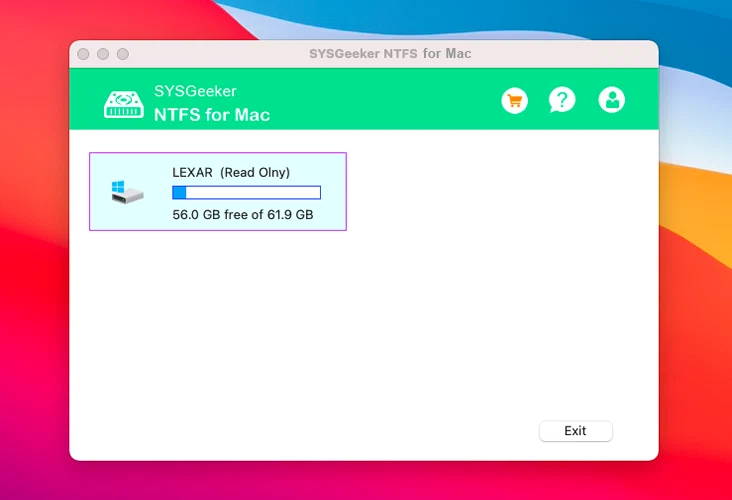
Step 2. Connect the read-only NTFS drive to your Mac. SYSGeeker NTFS for Mac will automatically recognize your NTFS hard drive and l show Read-Only tag on the program.
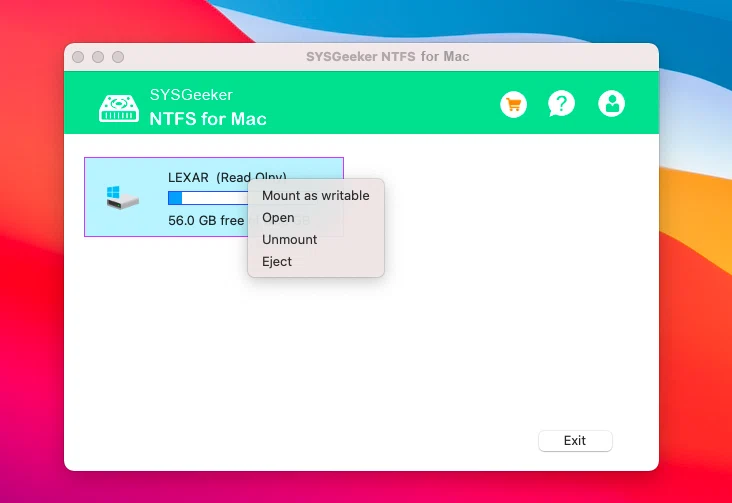
Step 3. Right click the NTFS drive icon and select "mount as writable" option.
Step 4. Your NTFS drive will open in a new window, and you should be able to read and write on NTFS drive like any other drive on your Mac.
Read and Write NTFS Drive by Using FUSE for macOS
This is a free GUI-based tool, however, using it is a bit more complicated that SYSGeeker NTFS for Mac. This is because you need to manually mount your NTFS drive every time you plug it in, otherwise, you will have to disable SIP while leaving your Mac vulnerable. If you don't mind that extra work, then feel free to use this tool. This tool uses the FUSE API to extend macOS's native file handling capabilities via third-party file systems. It officially supports the Apple Silicon M1 chips, however, it has been known to cause boot up problems in these devices. Also, being an open-source project, there is absolutely no technical support available for this tool to bail you out in case you stumble across any issues.
Step 1. Open a Terminal window on your Mac. You can read the first method to know how to do this, it has been explained there.
Step 2. Type the following code and press Return to install XCode on your Mac. Click on the Install button when prompted on the screen.
xcode-select --install
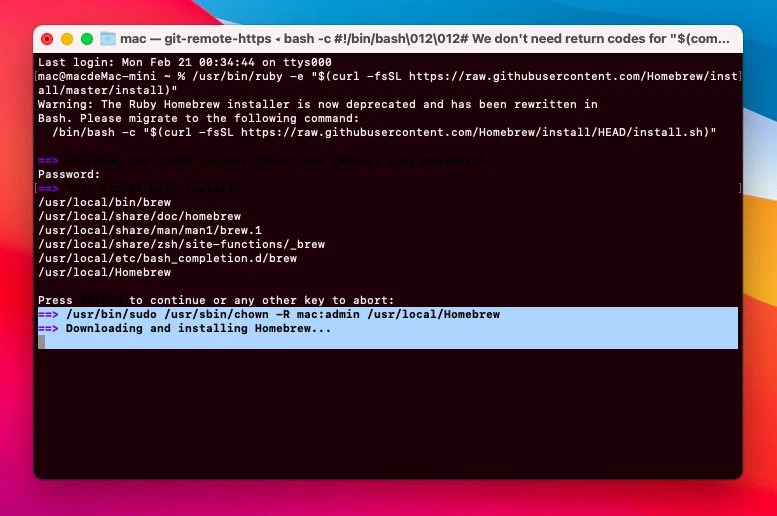
Step 3. Next, use the below command on the same Terminal window to download and install Homebrew on your Mac. This is a package manager for your Mac. It might ask you for your password, enter the same and press Return.
/usr/bin/ruby -e "$(curl -fsSL https://raw.githubusercontent.com/Homebrew/install/master/install)"
Step 4. Once done, go over to the FUSE for macOS utility from their GitHub repo using the below link.
https://osxfuse.github.io/
5.Next, you need to install NTFS-3G. You can do that by using the below command on the Terminal window. This uses Homebrew, which we had installed earlier, to help install the NTFS-3G package.
brew install homebrew/fuse/ntfs-3g
6. Next, restart your Mac. Once it has rebooted, you should be able to mount NTFS drives in read/write mode. Open a Terminal window on your Mac, then type the below command and press Return. This creates a mount point at /Volumes/NTFS. You only need to do this once.
sudo mkdir /Volumes/NTFS
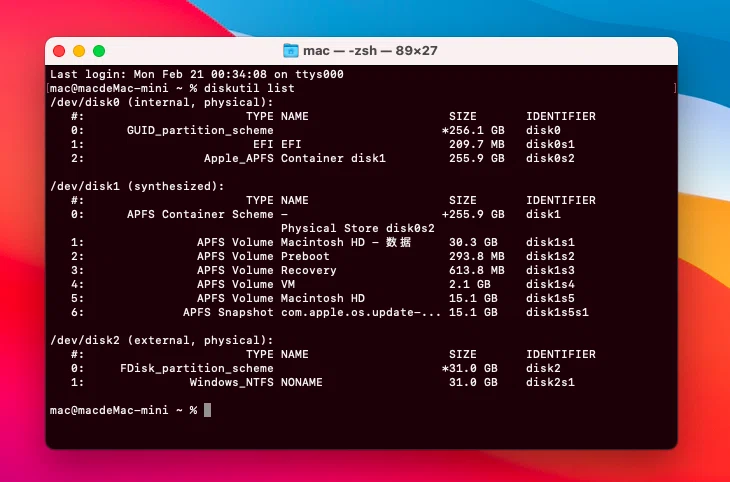
7. Now, connect the NTFS drive to your Mac and use the below command in the Terminal window. This will provide you with an identifier for the NTFS drive you just connected.
diskutil list
8. Since the NTFS drive was automatically mounted, you need to unmount if before proceeding further. Use the below command to do that. Here, remember to replace ntfs_disk with the identifier against your NTFS drive.
sudo umount /dev/ntfs_disk
9. Now, use the below command to mount your NTFS drive for read and write operations.
sudo /usr/local/bin/ntfs-3g /dev/ntfs_disk /Volumes/NTFS -olocal -oallow_other
10. At this point, the NTFS drive should be shown on your desktop. You can use it to read and write files on it. Once done, you can eject it normally.
NOTE: If you still not be able to write your NTFS drive, try to add an additional parameter to the NTFS mount script by using nano.
Pros
- Free open-source utility.
- No need to disable SIP.
Cons
- Complicated and lengthy manual process.
- Does not automatically mount NTFS drives. For that, you need to disable SIP
- No technical support available at all.
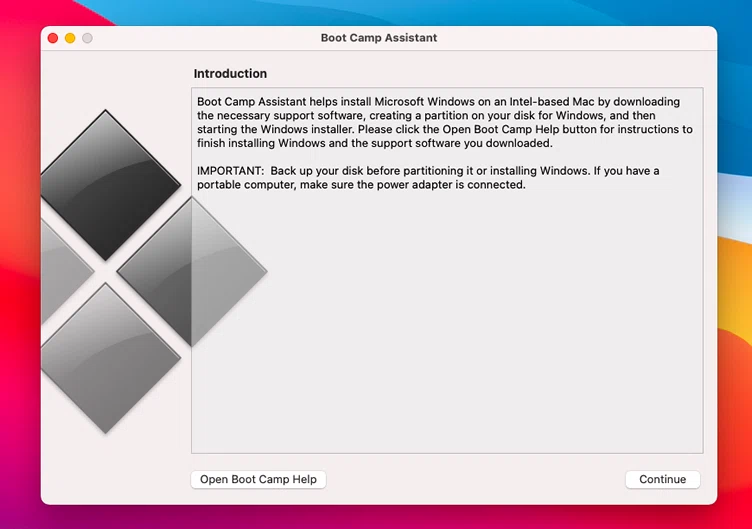
Read and Write NTFS Drive by Using BootCamp
Boot Camp Assistant is Apple's booting utility that assists users in running Windows operating systems on Intel-based Mac computer naively, so, this is also a nice option for accessing and editing NTFS drives directly from your Mac computer, but these may be more difficult to set up and less reliable, meanwhile, installing Windows on a Mac will consume a lot of CPU resources and delete all of your old Time Machine backups.
However, Bootcamp has been abandoned on Macs with running the newest version of macOS Big Sur and monterey, and it's said that Apple will simply disallow Bootcamp for all Macs, if this were true, we will not have access to Boocamp to do anything.
To Sum Up
We see the latest technology ( ARM-based M1 chip) on Apple's latest Macs, but the incompatibility with Windows NTFS drives still troubles Apple users. Since this is not a one-time thing, to write and read NTFS drive on macOS, I prefer to chose SYSGeeker NTFS for Mac even though it is not a fully free utility. The benefits of using it is far more than using the other methods I had discussed above. First, I didn't need to disable SIP and leave my Mac open to attacks. After all security is the primary reason most of us choose Mac, isn't it? Moreover, this tool does everything automatically without me having to type in cryptic commands. This makes it easier for me to focus on my work rather than mounting NTFS drives.