Copying ISO to USB on macOS is is not a simple matter because you may encounter a variety of strange issues in the production process, whichever way you do it, such as "couldn't validate source" when burning ISO with Disk Utility, Bootcamp doesn't work or USB won't boot. Many of the problems you face is because macOS X doesn't natively read the particular ISO image file, which is likely NTFS file. So, if you intend to burn a Windows 10 ISO image file into a bootable USB installer on a macOS without Bootcamp and less error-prone. you will need to find the most reliable and simplest way to burn ISO image to USB drive.
Fortunately, there are many tools with free trail can do it, like command line with dd, WonderISO, UNetbootin, Vitualbox and more. What might be easier, however, is depending on your computer skill levels and effect levels. In this article, you'll find detailed instructions and answers to your questions on copy ISO to USB on macOS.
Method 1. Burn ISO to USB on Mac with Terminal
The first way I recommend is by using dd commend-line under Utilities, which is able to make a byte-for-byte copy of ISO image and partition table, you should know dd is a command line-only interface, which is somewhat advanced and might not suitable for the low skilled mac users. Here the entire steps.
Step1. Back up your USB drive first as your USB drive will be erased completely before you start.
Step 2. Connect your USB to mac computer, then perform Format or Erase for your USB drive by using Disk Utility (under Application/Utilities). Note, you can select MS-DOS (FAT) for the Format.
Step 3. Launch the Terminal and type the following command to list volumes.
diskutil list
Locate the name of the USB drive. It should be something'like /dev/disk0, ./dev/disk1, /dev/disk2... It might be different on your Mac.
$ diskutil list
/dev/disk0
#: TYPE NAME SIZE IDENTIFIER
0: GUID_partition_scheme *251.0 GB disk0
1: EFI EFI 209.7 MB disk0s1
2: Apple_CoreStorage 250.1 GB disk0s2
3: Apple_Boot Recovery HD 650.1 MB disk0s3
/dev/disk1
#: TYPE NAME SIZE IDENTIFIER
0: Apple_HFS Macintosh HD *249.8 GB disk1
Logical Volume on disk0s2
Unlocked Encrypted
/dev/disk3
#: TYPE NAME SIZE IDENTIFIER
0: partition_scheme *5.3 MB disk3
1: partition_map 32.3 KB disk3s1
2: FAT_32 THE_DESTINATION 8.2 GB disk3s2
/dev/disk4
#: TYPE NAME
Step 4. make sure you've selected the right volume name, then start to unmount it by typing the command:
diskutil unmountDisk /dev/disk2
It should show something like this: Unmount of all volumes on disk2 was successful.
Step 5 . Now you will be asked to erase your USB drive by replacing the ISO image, make sure you've select the right identifier to avoid the unintended data loss.
sudo dd if=/path/to/win-iso-file of=/dev/disk2 bs=1m
In this command line, /path/to/win-iso-file is the full path of your ISO image file, make sure you type the full path. And the 'r' signifier should be placed in front of the disk identifier, while the'bs=1m' should be placed at the end of blocksize.
Step 6. Make sure all of the syntax you typed are correct, then press Enter it and high return, you may be asked to enter the admin password. Then the process will start immediately,
Step 7. There is no progress bar, but it's burning ISO to USB on Mac in the background, and stop any operations but wait it out. It might take 10 to 45 minutes.
Step 8. Once it's done, you can see the output records in/out and bytes transferred. Then eject the volume by following command.
diskutil eject /dev/disk2
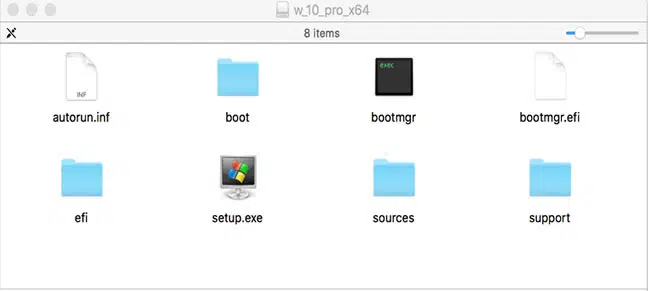
Now, If nothing else, you should get a bootable USB installer. You can re-insert your USB drive to computer and check if there are some files and folders contained in it, especially a setup.exe and an autorun.inf file. Be careful with dd comamnd, as if you get the device wrong or execute the wrong command, you could overwrite your OSX drive.
Method 2. Burn ISO to USB on macOS with WonderISO
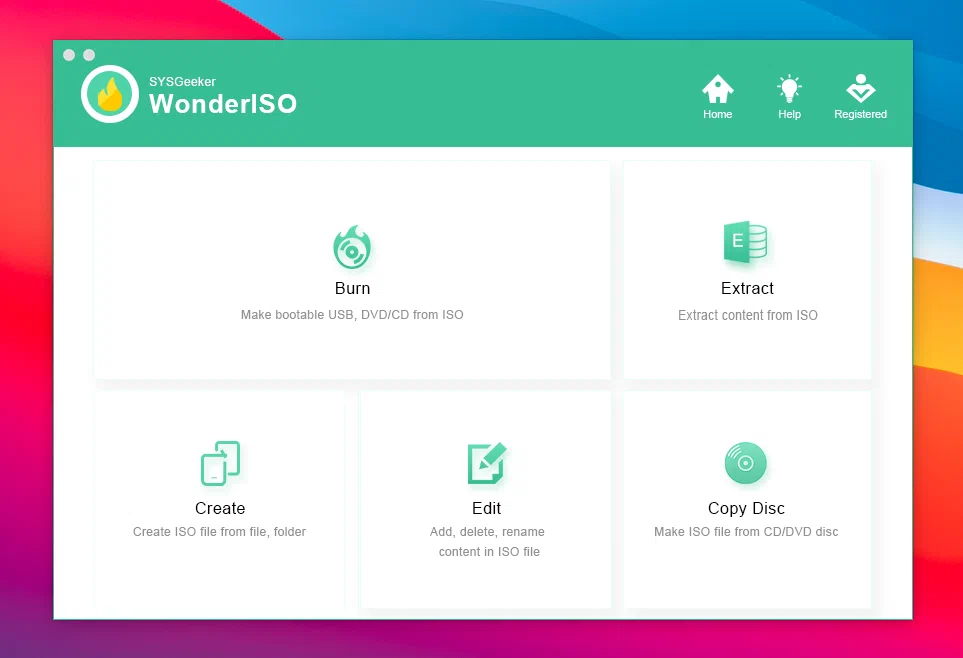
The second I highly recommend is WonderISO tool, which is a top alternative solution for having your ISO bootable without involving complex command line. It should be used by either invoices or experts since it comes with a intuitive interface, there are 5 functions especially designed to handle ISO image file that can meet different customer needs. They are "Burn ISO", "Extract ISO", "Create ISO", "Edit ISO", "Copy ISO from Disc". To burn ISO to USB on macOS with bootable info (UEFI or MBR), just click "Burn ISO" option, import your Windows ISO and select boot type, that's all! I've tested it twice and it was be able to boot up my Win 10 ISO on another computer and there is no shortage of necessary drivers.
WonderISO
- An all-in-one ISO Burner tool that lets you burn ,extract, crate and edit ISO image file straightforwardly!
- Compatible with all Windows system including the latest version of Windows 10.
- Support UEIF+MBR and UEFI+GPU boot mode.
- Works with both USB flash drives and CD/DVDs.
- Support latest macOS Ventura (M1/M2).


Steps to Burn ISO to USB on macOS.
Step 1. Like most of other desktop software, you will first need to download and install the WonderISO for Mac version on your Mac computer. After installation, launch it, the main interface should be like this:
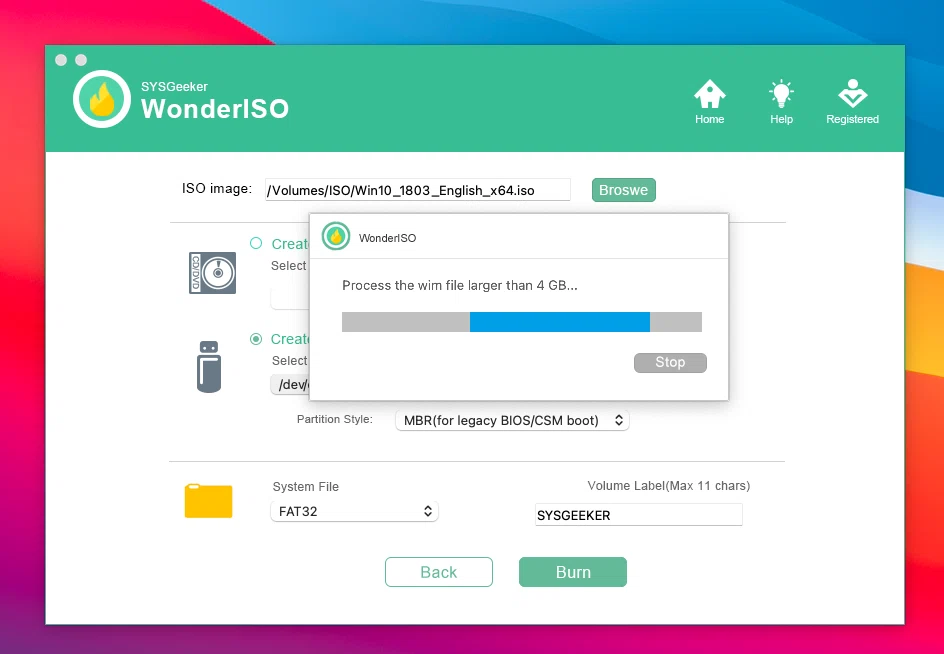
Step 2. For burning ISO to USB on macOS, we need to take advantage of "Burn" function. Just click "Burn" button to enter the "Burn" Window, then load your Windows ISO image, and select your USB drive letter. You can also select the boot style:UEFI or MBR based on your target computer.
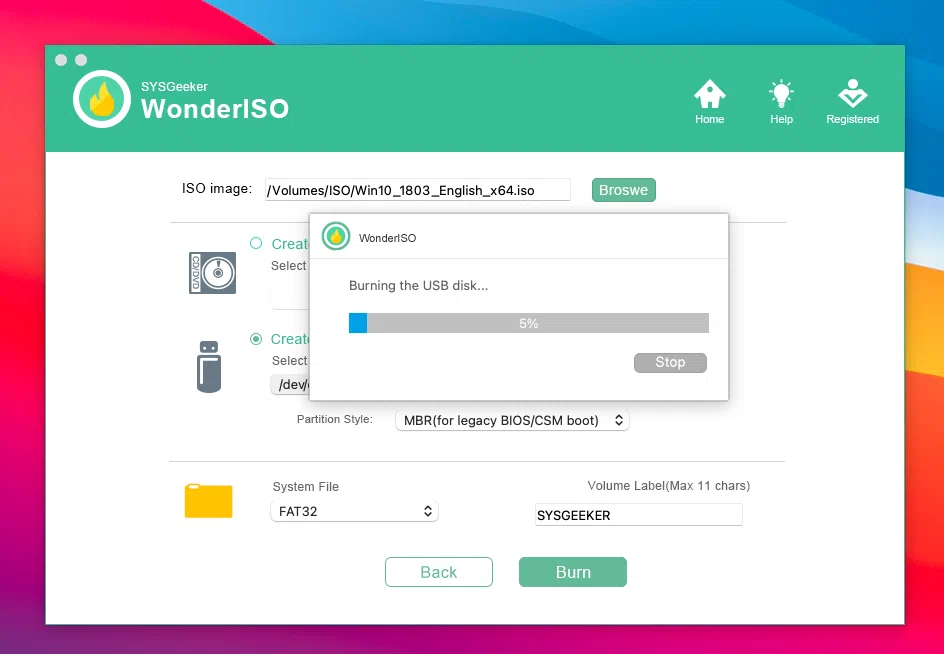
Step 3. Make sure all settings are complete correctly, just click BURN button to start copying ISO file to USB on maOS byte-by-byte. This may take you anything from 5 minutes to 20 minutes, depending on the writing speed of your USB drive.
Once it's completed you can exit WodnerISO tool and remove the USB key from your OS X machine,now, your USB drive should be bootable with Windows ISO. You can boot up your ISO on on another Windows computer.
As you see, copying ISO to USB on mac can be done within 3 steps without using complex settings or command. After test, I was obliged to admit the fact that WonderISO is consistently reliable in creating bootable USB drive. I suggest you to give it a try.
Method 3. Burn ISO to USB on Mac with Virtualbox
VirtualBox is a free software allowing you to use physical disks as virtual hard disks, and it also allows users to attach and boot USB drive in VirtualBox. If you've installed virtualBox on your Mac then that would be a great and fast method to burn ISO to USB on macOS, you can install Windows on your virtualBox then use windows tools to write ISO to USB.
Step 1. Assume that you have Windows installed Parallel or Vmware on your Mac, then run it. I'm not going to introduce how to install VirtualBox on a Mac here as we will nake it as a special in the future.
Step 2. In addition to Parallel or Vmware, you can also use Windows virtual machines that published by Microsoft to create a bootable USB drive on Mac.
Step 3. Please note that the Mac with USB 3.0 ports are not currently supported under VirtualBox , so you may find your Windows won't read the USB 2.0 port, that's because your system lacks of VirtualBox Extension Pack, download and install it on your Windows (VirtualBox ) , then click Ports from the settings in the virtual machine, just enable the USB 2.0 EHCI.
Step 4. When you attach your USB drive to you mac, it will be identified by mac OS X but VirtualBox, that's because only one OS can be able to control a USB port at a time. To fix this, what you need to do is just eject it from your mac OS, then VirtualBox will automatically recognize your USB drive, namely you can see your USB in the Windows OS.
Step 5. As long as Windows VirtualBox recognizes your USB drive then there are lots of tools allowing your to burn ISO to USB on Mac OS. Like rufus, Windows 7 USB DVD Download Tool.
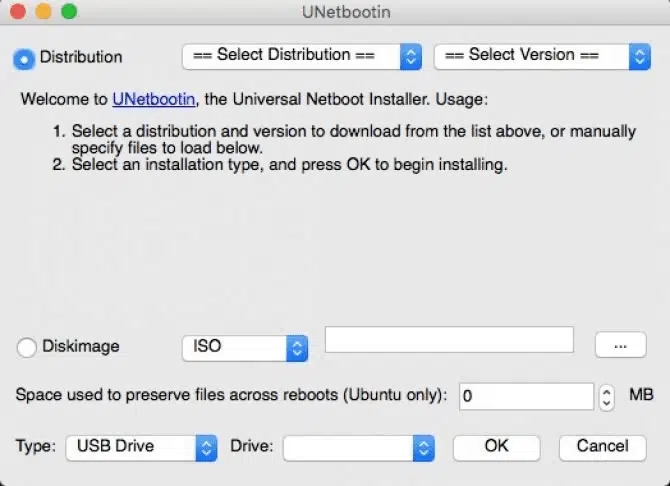
Method 4. Copy ISO File to USB on Mac using UNetBootin
UNetbootin is another way used to burn ISO file to USB on macOS, it's compatible with all Windows ISO and Linux distributions. The approach is to attach a physical drive to a machine using the command-line tool that comes bundled with UNetbootin. Note that you must use the UEFI boot option when picking the USB instead of Legeacy boot option.
Step 1. Like the Method 1, you will also need to check the path name of your USB flash drive by executing the following command:
diskutil list
Step 2. Download the UNetbootin tool on your macOS and install it. Then move the DMG file to the /application folder. You can also install it by the following command.
brew cask install --appdir="/Applications" unetbootin
Step 3. Open the UNetbootin tool, select the ISO in the Diskimage option and load your Windows ISO files by clicking the ..., select the USB in the type option. Then click OK button and wait to the process end.
Someone had reported that the method for using UNetbootin did not work, if so, please try to change another USB drive with enough space.
Yo may be suffering the trouble because your Windows computer has to face the fact of being reinstalled, even though you've tried everything to get it back to normal. However, burning ISO to USB on mac is not as easy as the way you do on windows because macOS lacks of working ISO burning tools. dd command line is the traditional and official way that only can be used by those who are comfortable with command line. So, what choices will you make If you're a computer novices, I will highly recommend choosing WonderISO tool to do the entire job, no risk, no command and easy to use!