Table of Contents
Apple recently released the new macOS Monterey update, which offers a wide range of new features and improvements. Unfortunately, some users may find that their hardware or software is not compatible with the new version. You know that you cannot directly downgrade macOS from Ventura to Monterey as Apple does not provide a way to do this, and any attempts to do so may cause serious harm to your system.If you’re one of these users and want to downgrade from macOS Ventura to Monterey, this article will show you how.
What should You Know About macOS Ventura?
macOS Ventura is the latest version of Apple’s operating system. It features a new design, improved performance, and enhanced security features. It also comes with a suite of apps and services designed to make life simpler and more productive. It is available as a free update for all compatible Macs.
Why You Want to Downgrade macos Ventura to Monterey?
If you are running macOS Ventura, you may want to downgrade to macOS Monterey if your hardware or software is not compatible with the new version. macOS Monterey offers a wide range of new features and improvements, but some users may find that their hardware or software is not compatible with the new version. If this is the case, downgrading to macOS Monterey may be the best option.
Back up Your Mac
Before downgrading from macOS Ventura to macOS Monterey, it is important to back up your data. This includes any documents, photos, music, applications, and settings that you have on your Mac. You can do this using Time Machine or by manually copying your data to an external hard drive. This will ensure that you don’t lose any of your important files during the downgrade process.
1. Open Time Machine.
2. Connect an external hard drive to your Mac.
3. Select the external hard drive as the backup destination.
4. Click “Back Up Now” to start the backup process.
5. Wait for the backup process to complete.
Method 1. How To Downgrade macOS Ventura With Time Machine Backup
1. Make sure you have a Time Machine backup of your Mac from before you upgraded to macOS Ventura.
2. Restart your Mac and hold down the Command + R keys to boot into the Recovery mode.
3. When the macOS Utilities window appears, select “Restore From Time Machine Backup”.
4. Select your Time Machine backup and click “Continue”.
5. Select the “macOS Monterey” version when prompted and click “Continue”.
6. Follow the on-screen instructions and wait for the process to complete.
7. Once the process is complete, your Mac will be downgraded to macOS Monterey.
The prerequisite for using this method is that you have a Time Machine backup from before upgrading to macOS Ventura. If you don’t have one, you’ll need to find a different solution.
Method 2. Downgrade macOS Ventura to Monterey with macOS Recovery Mode
This option works if you don’t have a macOS Montery Time Machine backup available. Downgrading to macOS Monterey from macOS Ventura is possible but not recommended by Apple.
To downgrade your Mac to macOS Monterey, please follow the steps below:
1. Put your Mac into macOS Recovery Mode
a. Shut down your Mac and wait a few moments
b. Press and hold the ‘power’ button until you see the Apple logo.
b. Immediately press and hold the ‘Command + R’ keys until you see the macOS Recovery menu.
2. Erase the Mac
a. Once you’re in macOS Recovery mode, select the ‘Disk Utility’ option.
b. Select your system drive, typically ‘Macintosh HD’.
c. Select the ‘Erase’ tab.
d. Choose ‘Mac OS Extended (Journaled)’ as the format.
e. Click ‘Erase’ to erase the drive.
3. Reinstall macOS Monterey
a. Once the drive is erased, go back to the macOS Recovery menu.
b. Select ‘Reinstall macOS’.
c. Follow the on-screen instructions to install macOS Monterey.
Your Mac should now be running macOS Monterey.
Method 3. How to Downgrade macOS Ventura Using a Bootable Installer
Downgrading macOS from Ventura to Monterey isn’t possible. However, you can install Monterey on a separate partition on your hard drive and restore your data from a backup. This process can be time-consuming, so make sure you have enough time to complete it.
Step 1. Download a compatible version of macOS.
Visit the Apple website or a reliable source to download an older version of macOS. Ensure the version you download is compatible with your system.
Step 2. Create a bootable installer.
Use a USB drive or external hard drive to create a bootable macOS installer. To do this, open the Disk Utility app and select the drive you want to use for your bootable installer. Then, select the “Erase” tab and choose the “Mac OS Extended (Journaled)” format and click “Erase”.
Step 3. Open the terminal.
Once you’ve created your bootable installer, open the Terminal app. Then, type the following command into the terminal and press enter:
sudo /Applications/Install\ macOS\ {name-of-your-downloaded-os}.app/Contents/Resources/createinstallmedia –volume /Volumes/{name-of-your-drive} –applicationpath /Applications/Install\ macOS\ {name-of-your-downloaded-os}.app
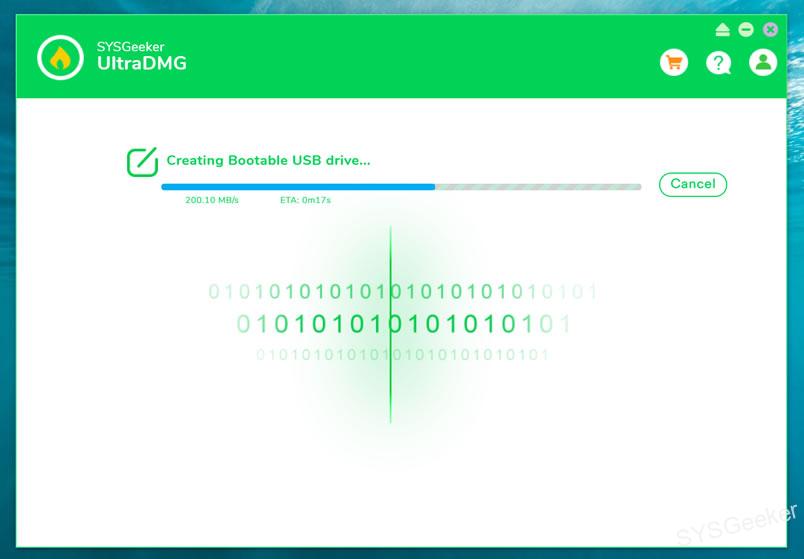
Alternative Option (UltraDMG)
If you are not familiar with the command prompt, or dare not use it, you are afraid of making mistakes. We recommend using the UltraDMG tool, which is an automated DMG writing software. It can also be used to extract any file in the DMG.
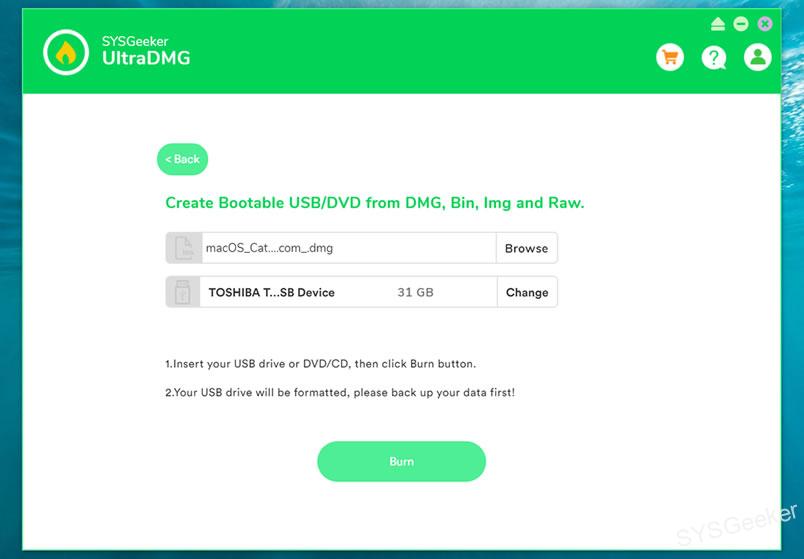
Plug in your USB or external hard drive and import your DMG file to program, then click "BURN" button, UltraDMG will automatically create a bootable installer for the selected macOS version.
4. Restart your Mac.
Hold down the “Option” key while restarting your Mac. This will bring up a menu of drives that you can use to boot your system. Select your bootable installer.
5. Erase your Mac.
Once you’ve selected your bootable installer, you can choose to erase your Mac and install the older version of macOS. You’ll also be asked to choose a disk format. Be sure to select “Mac OS Extended (Journaled)”.
6. Reinstall macOS Ventura.
Follow the on-screen instructions to reinstall the older version of macOS. The installation process may take some time. Once complete, your Mac will be running the older version of macOS.
Downgrading macOS Ventura to a previous version is possible, but it requires a lot of preparation and knowledge. By following the steps outlined in this tutorial, you will be able to successfully downgrade your macOS Ventura system to a previous version. Once you have downgraded your system, you may also want to restore your data to ensure that everything is working properly.