Table of Contents
There are a few reasons why you might want to create a macOS Monterey bootable USB. Maybe you want to perform a clean install of macOS Monterey as macOS Monterey was just released, or you want to create a backup in case your Mac’s hard drive fails or if you want to install it on multiple Macs. Whatever the reason, it’s a good idea to know how to create a bootable macOS Monterey USB drive.
The process of creating a macos monterey bootable USB on Windows 11 is very simple, but if you want to try the command tool to do it, you will be responsible for data loss and system damage. Be sure to follow the instructions in the text exactly to avoid any possible setbacks. In this blog post, we will show you how to create a bootable USB for macOS Monterey on a Windows 10/11 PC.
What You Need
In order to create a bootable USB of macOS Monterey, you will need the following:
– A Windows 10/11 PC
– A USB flash drive that is at least 16 GB in size
– A copy of macOS Monterey
Download macOS Monterey
There are many ways to donwload macOS the installer DMG for macOS Monterey.
1.The first method is that you can download macOS Monterey from the Mac App Store. You can do this by opening the App Store and searching for "macOS Monterey." Once the results come up, simply click on the "Download" button.
2. If you want to download the installer DMG for macOS Monterey, you also can find it on the Apple website. Just go to the Apple website, click on the "Downloads" tab, and then scroll down to the "macOS Monterey" section. There, you will find a link to the installer DMG.
3. Alternatively, you can also find the installer DMG on various other websites that offer macOS downloads. Just make sure that you download it from a reputable source, as there are many scams out there.
You can download MacOS Monterey 12 from here: (Direct link to InstallAssistant.pkg, App Store link)
Format Your USB Flash Drive
Assuming you’re going to use a Windows computer to make a Mac installation disk, then I suggest you format your USB on Windows.
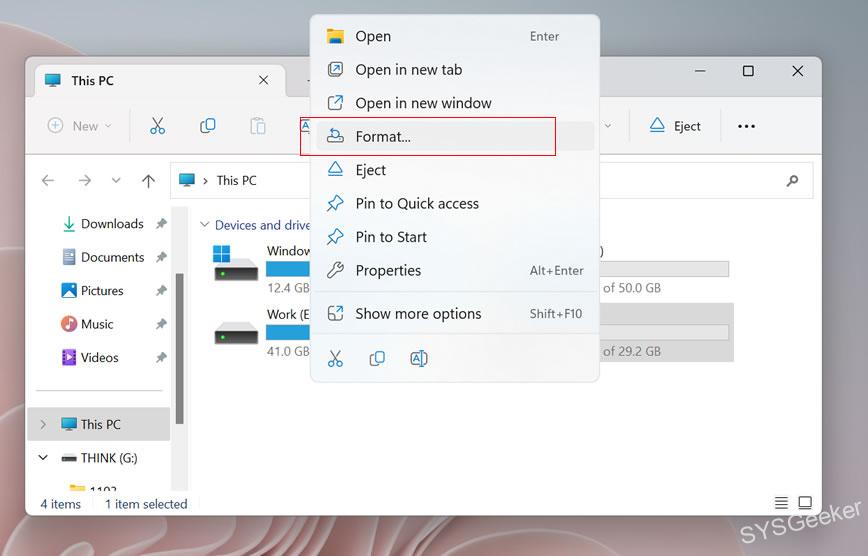
1. Plug your USB flash drive into your PC.
2. On your PC, open up My Computer and take a look at the drives listed. One of them should say "Removable Disk" and have the size of your USB flash drive next to it. If you don’t see it, try unplugging and re-plugging in your USB flash drive.
3. Right-click on the Removable Disk and select "Format…"
4. In the Format window that pops up, make sure that the "File System" drop-down menu is set to "FAT32". You can leave the "Allocation Unit Size" field alone. Then, click the "Start" button.
5. A warning message will pop up asking if you’re sure you want to format the drive. Click "OK".
6. The formatting process will now start and should only take a few seconds. Once it’s done, click "OK" and then "Close".
Ways to Create macOS Monterey Bootable USB
Basically, there are two ways to create a bootable USB drive for macOS Monterey. The first way is to use the Terminal application that is built into macOS, and the second way is to use a third-party application.
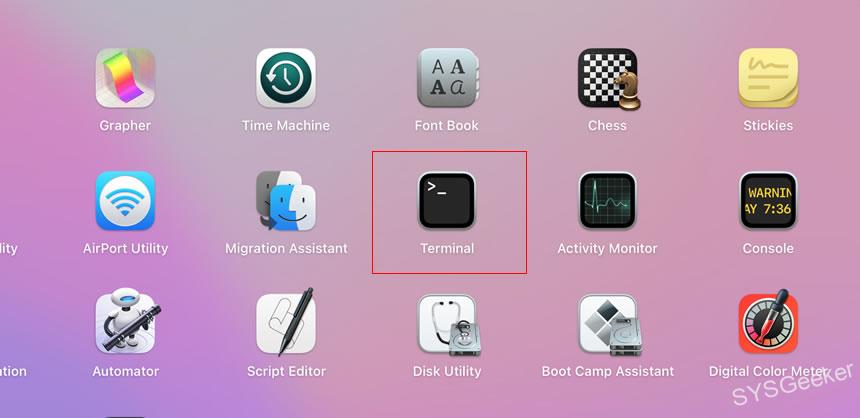
Part 1. How to Create macOS Monterey Bootable USB on Mac using Terminal
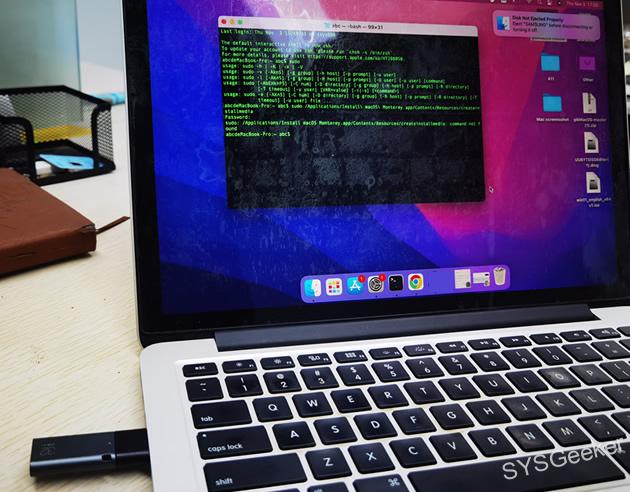
However, using Terminal is a little more complicated and requires you to know some basic commands, but it is also free. Let’s see how it works. If you want to create a bootable USB drive for macOS, you can use the createinstallmedia tool. This tool is included with the macOS installer, and it can be found in the /Applications/Utilities folder.
1. To use createinstallmedia, you will need a USB drive that is at least 8 GB in size. The drive will be erased, so make sure to back up any important data before proceeding.
2. Once you have the USB drive, open the Terminal app and use the following command:
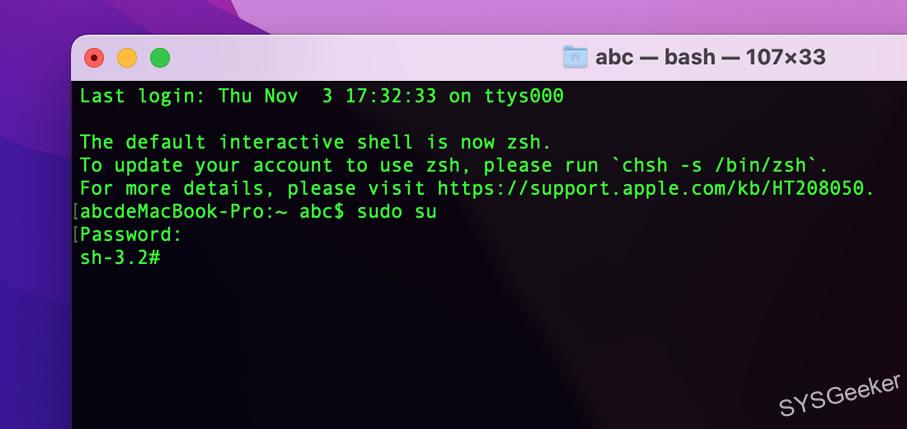
2. You need to enter the following command line to switch to the root account, then type the password.
sudo su
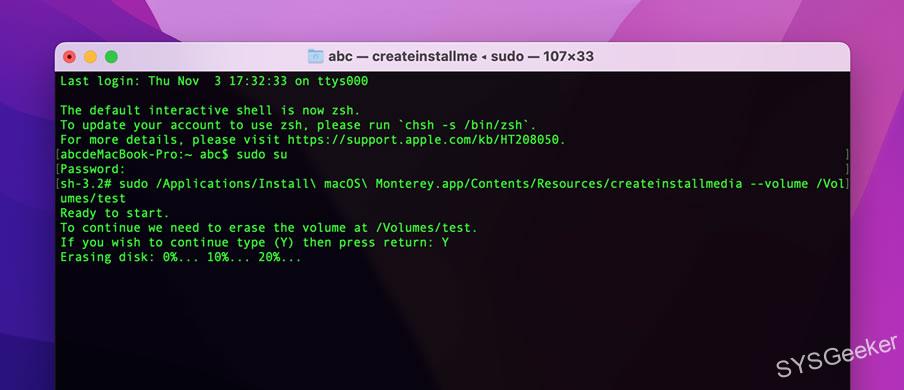
3. Copy the following command or paste it to the Terminal window. You can also drag the file createinstallmedia into the Terinmal window. It should bed located in Applications/Install\ macOS\ Catalina.app/Contents/Resources/.
sudo /Applications/Install\ macOS\ Catalina.app/Contents/Resources/createinstallmedia –volume /Volumes/test –nointeraction

4. After you paste the above command, then connect your USB drive into your Mac computer. You need to replace MyVolume with the name of your USB drive.
Then hit "Enter", you will be asked to enter the "Y" letter to erase the USB drive. This will take a while.
4. After the Erasing process is complete, the createinstallmedia tool will now create a bootable macOS installer on the USB drive.
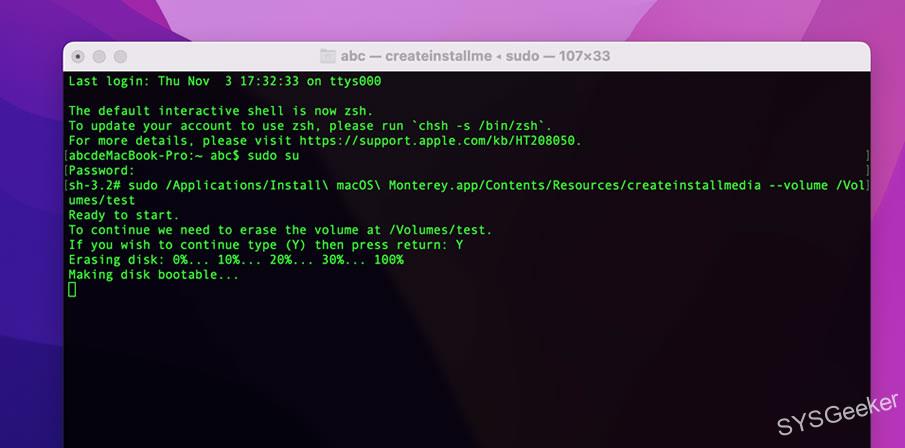
Once the process is complete, you can use the USB drive to install macOS on a Mac.
Part 2. How to Create macOS Monterey Bootable USB on Windows 11/10
If you want to make a macOS Moneterey on Windows computer, you need to have a tool that can create a bootable USB drive for macOS, and that tool is called UltraDMG. UltraDMG is a tool that can create bootable USB drives for macOS. It is very easy to use, and it can create a bootable USB drive for macOS in just a few minutes. you don’t have to deal with commands and Terminal.
So, here’s how you create bootable macOS Monterey USB drive on Mac step by step:
Step 1. You need to download the UltraDMG software from the website, and then install it on your Windows computer.
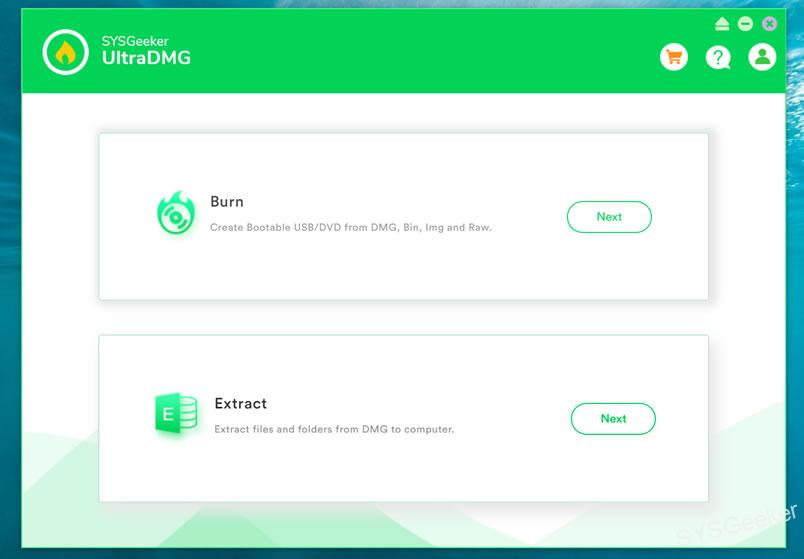
Step 2. Once you have installed UltraDMG, launch it and select the "BURN" option.
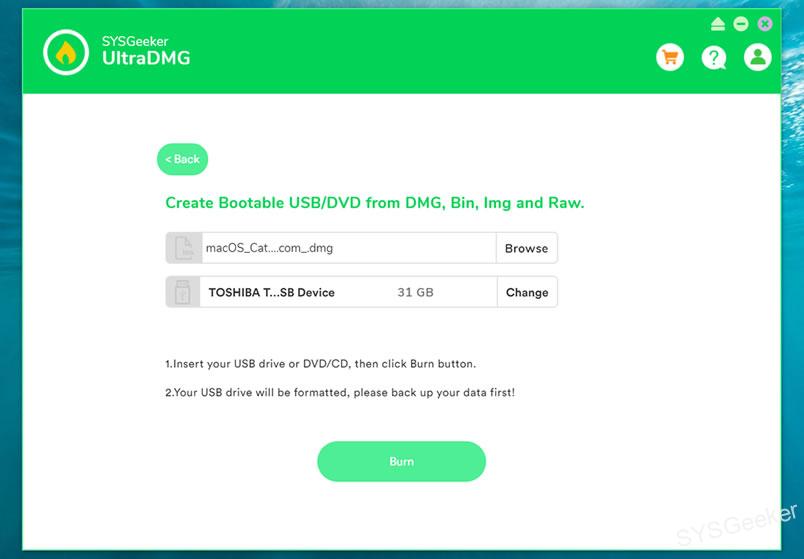
Step 3. In the next screen, you need to select the macOS DMG file and the USB drive that you want to use to create the bootable macOS USB drive.
Step 4. Once you have selected the USB drive, click on the "BURN" button, and UltraDMG will start creating the bootable macOS USB drive.
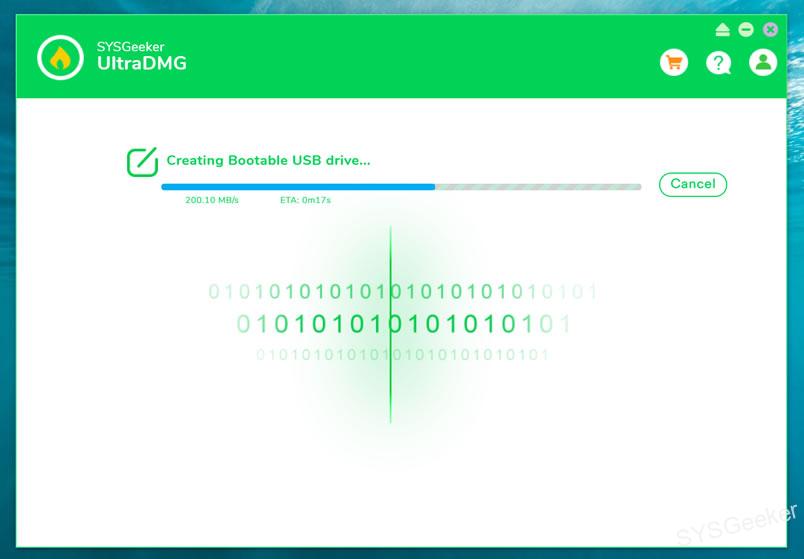
The process will take a few minutes to complete, and once it is done, you will have a bootable macOS USB drive that you can use to install macOS on your Mac.
Part 3. How to Create macOS Monterey Bootable USB on Windows 10 using TransMac
Transmac is a software application that enables users to read, write, and format Apple Macintosh disk drives, flash drives, and other drives with HFS (Mac OS Standard) or HFS+ (Mac OS Extended) file systems. Transmac can also create, compress, and expand dmg disk images.
There are some risks associated with using Transmac, as it is not a free application. In order to use Transmac, you must purchase a license, which costs $54.95 USD. There is also a risk that data could be lost or corrupted when using Transmac to write to HFS+ formatted drives, so it is important to backup any important data before using the software.
Here are the steps to create a bootable macOS USB drive using TransMac:
1. Download and install TransMac on your Windows 10 computer.
2. Launch TransMac and insert your USB drive into the computer.
3. In TransMac, click on the USB drive in the left sidebar and then click on the "Format Disk for Mac" option in the right sidebar.
4. In the format options, choose the "MS-DOS (FAT)" option and then click on the "Format Disk" button.
5. Once the formatting is complete, close the format window and click on the "Restore with Disk Image" option in the TransMac right sidebar.
6. In the restore window, click on the "…" button and browse for the macOS disk image file (DMG file).
7. Select the DMG file and then click on the "Open" button.
8. Click on the "Restore" button and wait for the process to complete.
9. Once the restore is complete, you will have a bootable macOS USB drive that you can use to install macOS on your Mac computer.
Boot from A USB Flash Drive on an Intel-based or M1 Mac
Once you have created the bootable USB, you can boot from it and install Monterey on your computer. The installation process is pretty straightforward and you should have no problems getting it up and running. Booting from a USB flash drive is a great way to troubleshoot your Mac, or to install a fresh copy of macOS. Here’s how to do it on both Intel-based and M1 Macs.
For Intel-based Macs
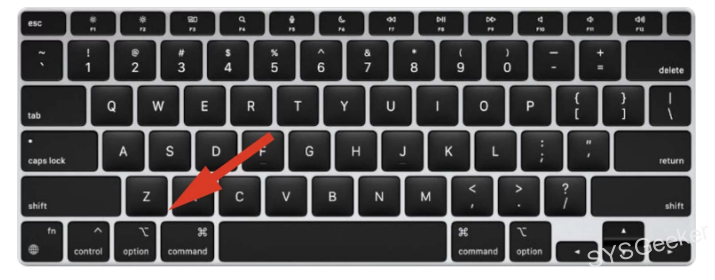
- Connect the USB flash drive to your Mac.
- Restart your Mac, and hold down the Option key while it boots.
- Select the USB flash drive from the list of boot options.
- Follow the prompts to install macOS, or to boot from a macOS recovery image.
For Apple Silicon:
- Connect the newly created USB installer to your Mac.
- Turn off your Mac.
- Press and hold the power button until you see a boot menu.
- Select the macOS Monterey installer USB from the boot menu.
There are actually many other ways to reinstall macOS, such as the Mac App Store or macOS Recovery, but I prefer to keep the macOS USB installer in hand so I can upgrade or reinstall on a colleague or friend’s Mac on the go.
- How to Create a Bootable MacOS Catalina 10.15 Installer Drive from Windows?
- 4 Ways to Burn Mac os x DMG to USB on Windows 10
- How to Create A Bootable MacOS Mojave USB Installer on Windows?
- How to Install macOS Big Sur on An Unsupported Mac?
Frequently Asked Questions:
Q1. How do I know if my Mac USB is bootable?
You can use the Disk Utility application to check if a USB drive is bootable. To do this, open Disk Utility and select the USB drive from the list of drives. If the drive is bootable, you will see the option to "Create Boot Disk."
Q2. Can you put the macOS installer in USB?
Yes, it is possible to put the macOS installer on a USB drive. This is useful if you want to install macOS on a computer that does not have a DVD drive or if you want to create a bootable installer to use for multiple computers.
Q3. Why won’t my Mac recognize my bootable USB?
There are a few possible reasons why your Mac won’t recognize a bootable USB. One possibility is that the USB is not formatted correctly. Another possibility is that the USB is not configured correctly as a bootable device. Finally, it is also possible that there is a problem with the USB port itself.
Q4. Can I install macOS without Internet?
Yes, it is possible to install macOS without Internet. One way to do this is to create a bootable USB drive with the macOS installer on it. This can be done by downloading the macOS installer from the App Store, then using the createinstallmedia tool that is included with the installer or third-party tools like ULtraDMG. Once you have created the bootable USB drive, you can boot your Mac from it and install macOS without needing an Internet connection.
Q5. Can I use an external SSD as a boot drive Mac?
Yes, you can use an external SSD as a boot drive Mac. You will need to format the drive to be compatible with MacOS, and you will need to set up the drive to be bootable. Once you have done this, you will be able to boot your Mac from the SSD.