Table of Contents
The latest system for Mac has been released, officially named macOS 13 Ventura. One of the big features that was supposed to come with this new system was the ability to write to NTFS drives. Unfortunately, this is still not possible with the new system and it is unknown when it will be added.
Why macOS 13 Ventura still can’t write NTFS drive?
The reason for this is still unclear, but it could be due to a number of factors.
- One possibility is that the new system is not yet compatible with all NTFS drives.
- Another possibility is that there are still some bugs that need to be ironed out.
- What’s more, the answer lies in the file system itself. NTFS is a Windows file system, designed to be used with the Windows operating system. macOS, on the other hand, uses the HFS+ file system. These two file systems are not compatible with each other, which is why macOS can’t write to NTFS drives.
In any case, if you’re still unable to write to NTFS drives on macOS 13 Ventura, there are a few workarounds that you can try. One is to use a third-party utility such as SYSGeeker NTFS for Mac, Paragon NTFS for Mac. This will allow you to write to NTFS drives without any issues.
Another workaround is to format the NTFS drive as exFAT. This will allow you to write to the drive without any issues, but you will not be able to use certain features such as file compression.
Neither of these solutions is ideal, but they will allow you to use NTFS drives with macOS 13 Ventura. If you need to read and write to NTFS drives on a regular basis, you may want to consider using a dual-boot system with Windows and macOS. This will allow you to have the best of both worlds, and you’ll never have to worry about compatibility issues again.
Part 1. Write NTFS Drive on macOS Ventura 13 using NTFS for Mac Tools
-
Use NTFS For Mac Tool
One of the ways to get around the incompatibility between NTFS file system and macOS is to use a third-party application that will enable writing to NTFS drives on macOS. There are a few different options available, but we recommend using the NTFS for Mac application from SYSGeeker NTFS for Mac tool.
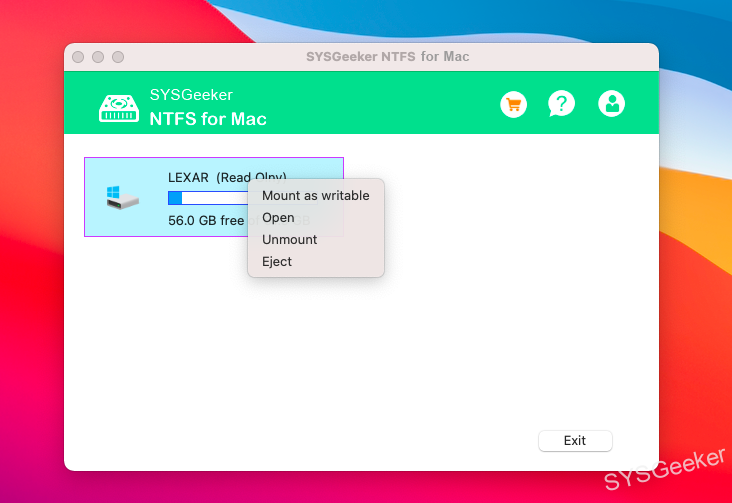
This app is available for a free trial, and it will allow you to write to NTFS drives on macOS 13 Ventura without any issues. SYSGeeker NTFS for Mac software also provides extremely fast data transfer speed, which can quickly transfer large data to externalhard drives without any errors.
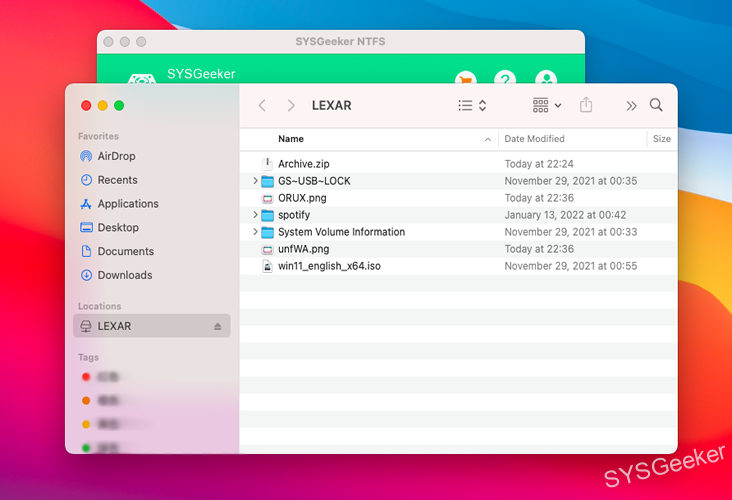
Once you’ve installed the app, simply connect your NTFS drive to your Mac and it will show up on the desktop. You can then read and write to the drive just like any other drive on your Mac.
-
Use NTFS-3G Tool (Free)
If you’re using a Mac with macOS 13 Ventura, you might be wondering why you can’t write to NTFS drive. The good news is that there is a way to do this using Terminal commands with NTFS-3G.
To use this method, you’ll first need to open Terminal. You can do this by going to Applications > Utilities > Terminal.
Step 1. Once Terminal is open, you’ll need to enter the following command to install Homebrew on your mac.
/bin/bash -c "$(curl -fsSL https://raw.githubusercontent.com/Homebrew/install/HEAD/install.sh)"

Wait for a while and Homebrew will be successfully installed on your Mac.
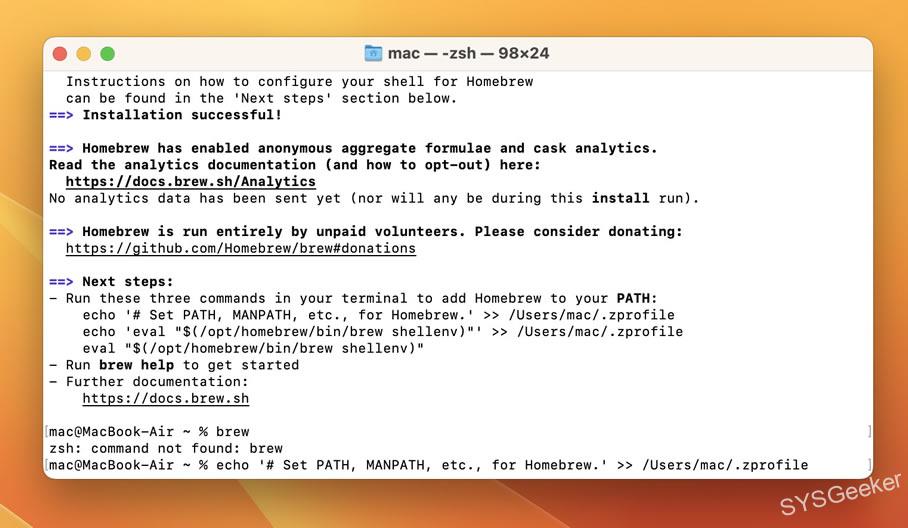
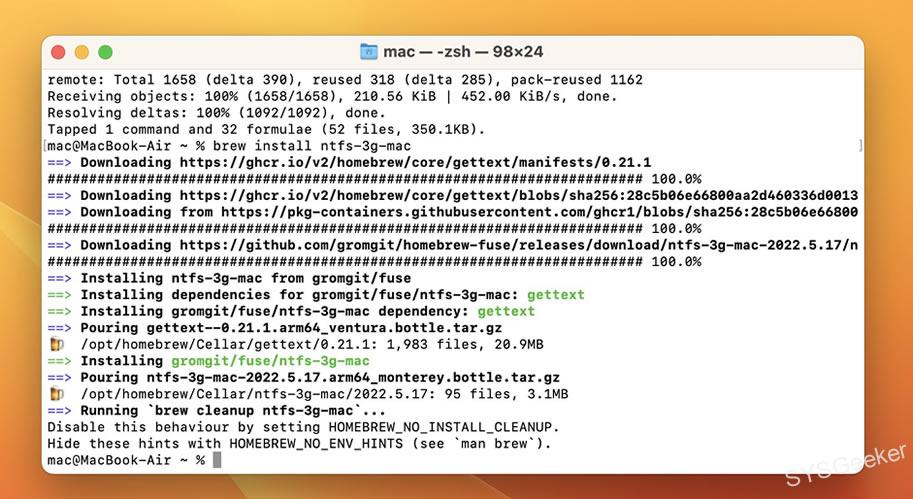
Step 2. Start to install NTFS-3G from Homebrew.
brew install ntfs-3g-mac
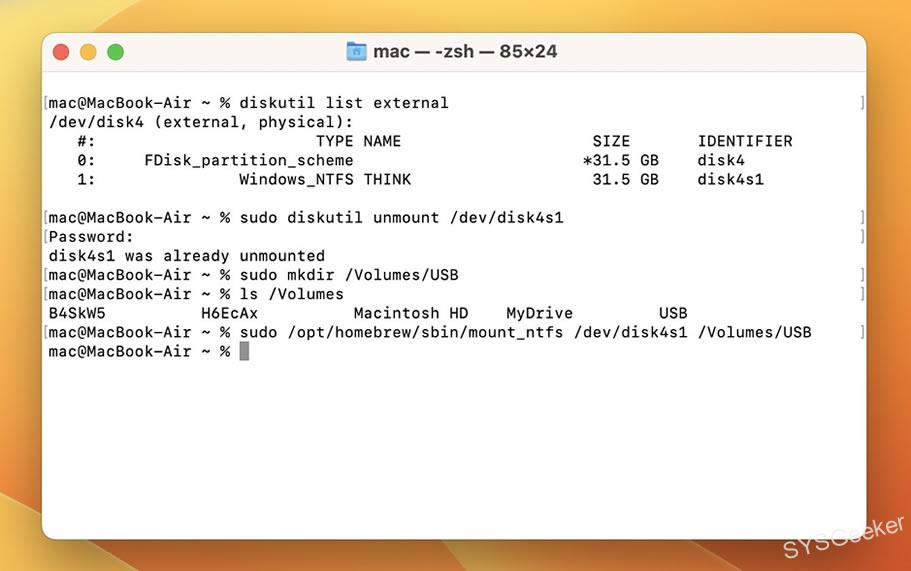
diskutil list external
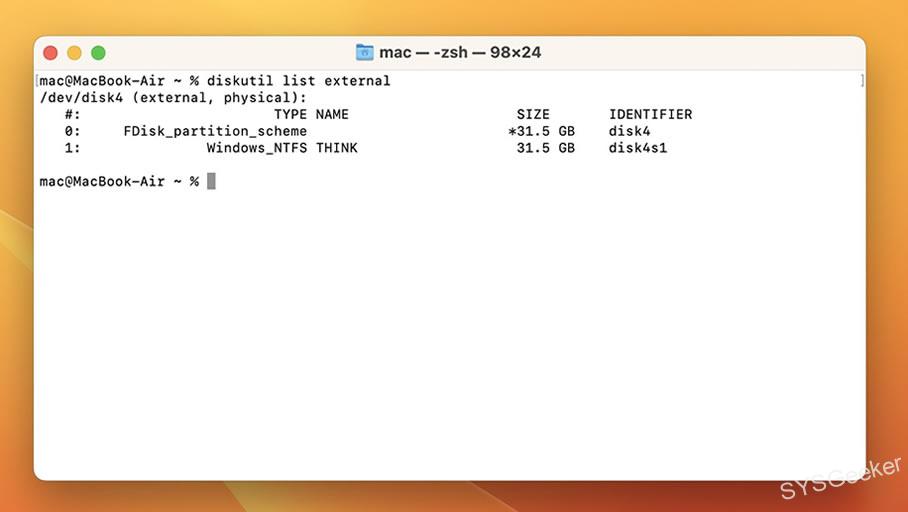
Step 4. Now, you need to create a folder for mounting your USB drive, Here I create a folder with name "USB".
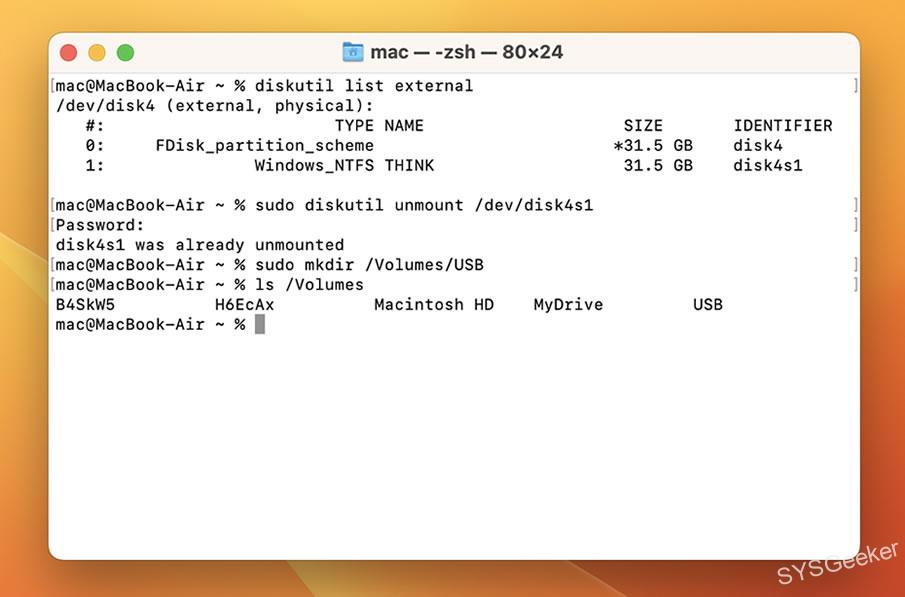
Next, you’ll need to enter the following command, don’t forgot to replace USB with your actual USB drive letter.
sudo/opt/homebrew/sbin/mount_ntfs /dev/disk4s1 /Volumes/USB
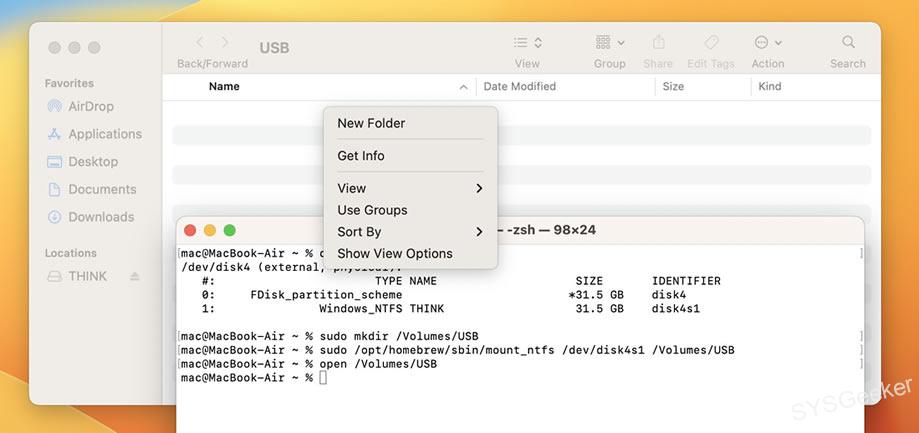
open /Volumes/USB
Once you restart your Mac and you’ve entered the command, you should now be able to write to the NTFS drive.
NOTE:
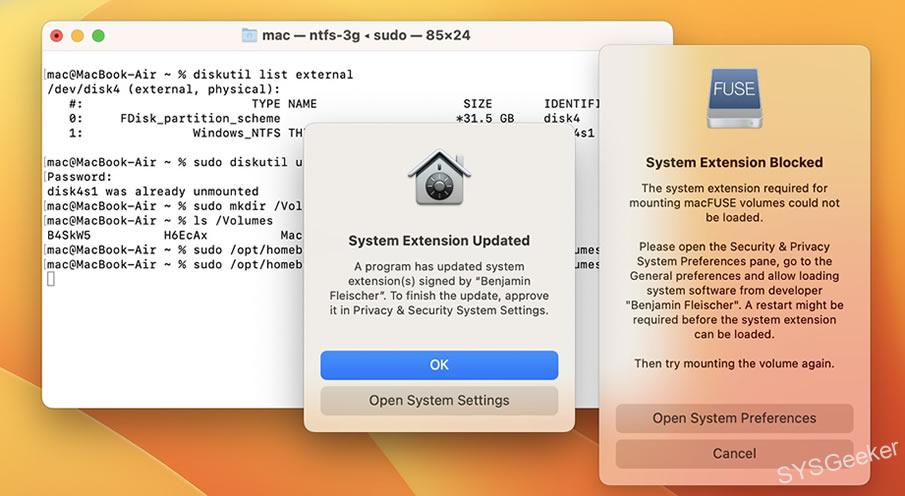
- You may be asked to update the macfuse in order to be compatible with the latest systems.
- To load the mounting macFUSE volumes in the system extension, you need to approve it in Privacy & Security System Settings.
- Restart your Mac computer so the new system extensions can be used.
There are a few things to keep in mind when using this method.
- First, you’ll need to enter the commands every time you want to write to the NTFS drive.
- Second, this method will only work if the NTFS drive is connected to your Mac.
- If you disconnect the drive, you’ll need to enter the commands again.
While this method isn’t perfect, it’s the only way to write to an NTFS drive on a Mac with macOS 13 Ventura.
Part 2. Write NTFS Drive on macOS Ventura 13 using Virtual Machine
One of the great things about virtual machines is that they can give you the ability to use features and applications that might not be available on your host operating system. This can be especially useful when it comes to working with files and drives that use the NTFS file system. You need to use a third party software, such as Parallels Desktop or VMware Fusion, to create a virtual machine (VM) on your Mac. This will allow you to install Windows on the VM and write to your NTFS drive from there.
Once Windows 10 is installed, you’ll need to connect your NTFS drive to your virtual machine. You can do this by using a USB cable or by mounting the drive in VMware Fusion.
Once the drive is connected, you should be able to access it from within Windows 10. You can now create, delete, and modify files on your NTFS drive just like you would on any other drive.
One thing to keep in mind is that you’ll need to eject the drive properly before you disconnect it from your virtual machine. If you don’t do this, you could corrupt the data on your drive.
That’s all there is to writing to NTFS drives on macOS using a virtual machine. This method is a great way to get around the limitations of macOS and to make sure that you can always access your data, no matter what file system it’s using.
Part 3. Write NTFS Drive on macOS Ventura 13 using Dual-boot System
Another way that you can write to an NTFS drive on macOS Ventura 13 is to use a dual-boot system. This means that you will have two different operating systems installed on your computer. One operating system will be macOS Ventura 13 and the other will be Windows. You can then use the Windows operating system to write to the NTFS drive. However
1. Supposed you’ve installed Windows 10 on your computer using a dual-boot system.
2. Once Windows is installed, open up the File Explorer.
3. In the File Explorer, locate the NTFS drive that you want to write to.
4. Right-click on the NTFS drive and select the “Format” option.
5. In the Format window, select the “NTFS” option from the File System drop-down menu.
6. Click on the “Start” button to format the drive.
7. Once the drive has been formatted, you can now write to it from the Windows operating system.
There are a few things to keep in mind if you decide to use a dual-boot system to write to an NTFS drive on macOS Ventura 13. First, you will need to make sure that you have enough space on your hard drive to accommodate two operating systems. Second, you will need to be comfortable with using both macOS Ventura 13 and Windows. This means that you will need to know how to switch between the two operating systems and how to access the NTFS drive from both operating systems. Finally, you should back up your data before you install a dual-boot system. This way, if something goes wrong, you will not lose any important data.
Overall, using a dual-boot system is a viable option for writing to an NTFS drive on macOS Ventura 13. It’s a bit of a hassle to set up and you will need to pay for a Windows license, but it will work.
Part 4. Write NTFS Drive on macOS Ventura 13 by Changing NTFS to ExFAT
If you need to write to an NTFS drive on macOS Ventura 13, one option is to change the format of the drive to ExFAT. ExFAT is a file system that is compatible with both macOS and Windows. This means that you will be able to write to the drive from either operating system.
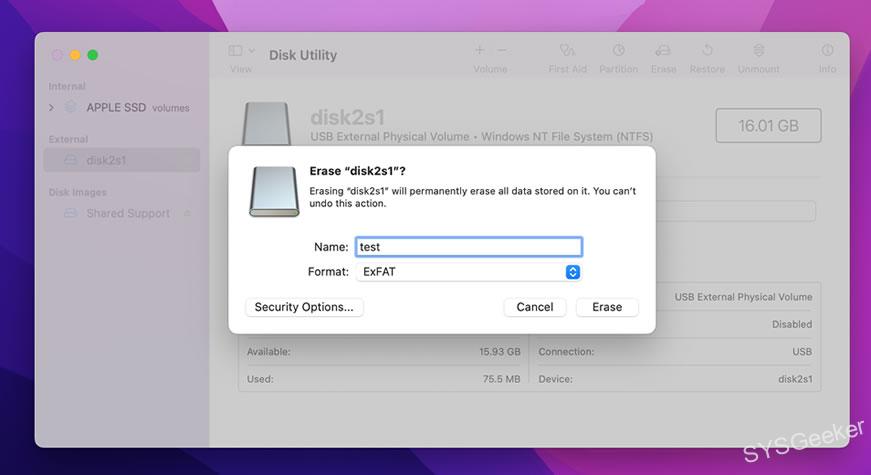
- To format the drive to ExFAT, open up the Disk Utility application.
- Select the NTFS drive from the list of drives.
- Click on the "Erase" button. In the "Format" drop-down menu, select the "ExFAT" option.
- Click on the "Erase" button to format the drive.
- Once the format is complete, you should be able to write to the drive from macOS Ventura 13.
One thing to keep in mind is that ExFAT is not as robust as NTFS. This means that it is more susceptible to data corruption. So, if you are going to use this method, you should make sure to back up your data regularly.
One thing to keep in mind is that both of these methods will require you to pay a monthly fee. So, if you are on a budget, you might want to consider one of the other methods.
Part 5. Use A Cloud Storage Service
Another option is to use a cloud storage service like Google Drive or Dropbox. These services allow you to store your files in the cloud and access them from any computer. This means that you can access your files from macOS Ventura 13 and Windows.
There are a few things to keep in mind when using a cloud storage service. You’ll need to have an internet connection to access your files and you’ll need to create an account with the service and install their app. Finally, you’ll need to pay for a subscription if you want to store more than a certain amount of data.
If you’re looking for a way to store your files in the cloud, Google Drive and Dropbox are two good options. Both services offer a free tier that gives you a certain amount of storage space. You can use either service to store your files in the cloud and access them from any computer.
All of these methods will allow you to write to an NTFS drive on macOS Ventura 13. Each method has its own pros and cons, so you will need to decide which one is best for you.